In modern apartments, balconies are as much a part of the house as the heated rooms. If you want to see your balcony comfortable and modern, then you need to insulate the balcony. Any owner who is used to doing everything on his own should know how to warm a balcony with his own hands.
Warming balconies requires certain skills, because it is a laborious process. In any case, we advise you to study the theory in advance in order to know for sure how to insulate the balcony yourself. For those who want to do all the work themselves from start to finish, the sequence of insulation work and tips for choosing materials are described below.

Content:
Necessary tools, materials and the cost of insulation of the balcony
To warm the balcony you will need such materials:
- Wooden slats;
- Self-tapping screws;
- Dowels with hats;
- Styrofoam;
- Polyurethane foam;
- Sheets of roofing material or hydroisol.
The material consumption must be calculated according to the area that needs to be insulated. Prices for insulation materials are different, but we advise you not to purchase cheap products, because their quality leaves much to be desired.
When warming a balcony with your own hands, take into account the fact that some materials have a poor attitude to high humidity, which is why wet insulation can cause mold and mildew. Therefore, when installing the insulation, you need to take care of the protective layer of waterproofing. It is also worthwhile to think over the design in details, choose finishing materials, roughly evaluate the decoration of the balcony, based on the family budget.
Preparatory work
Before you start warming the balcony, you need to remove all the old things, dismantle the old balcony frames, prepare the floor and walls. If your house has tiled decoration, it will be better to bring it down within your balcony. We leave concrete partitions and balcony railings, they will serve as an additional insulating layer. It can be sheathed with plastic or other decorative material.
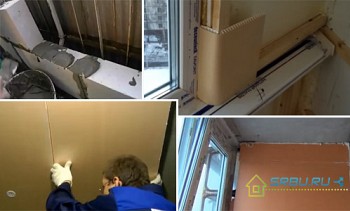
Balcony glazing
As soon as everyone has prepared for the work, we warm the balcony with plastic windows. Some owners leave an old wooden frame, which is blown out due to cracks, and the presence of one glass in the frame will not warm your balcony as it should. Even if the frame is still in good condition, it will not give that thermal insulation like plastic windows. Aluminum systems, like wooden frames, are a “cold” type of balcony glazing. Therefore, they will not work if you decide to combine a balcony with a heated living room.
After glazing the balcony, it is necessary to close all the cracks in the area of walls, floor and parapet, through which cold air can penetrate. For these purposes, such sealants and mastics as Hermabutil, Hermaflex, Emfimastic, Rabberflex are best suited.
Leveling and warming the floor
Almost a quarter of the heat on the balcony is lost across the floor. Therefore, if you decide to act on your own, then you need to know how to insulate the floor on the balcony with your own hands. It is better to start warming the balcony from the floor because its level will rise after warming. This is much more convenient and more profitable to do before warming the side walls.
Before you start insulating the floor on the balcony, you must remove the old coverings. You should also carefully inspect and tap the base plate. If there are holes, gaps, obvious voids in it, they need to be repaired with a solution.To avoid dampness and mold, the floors should be primed.
The choice of insulation material may depend on the material that will be used for finishing. If it is planned to lay ceramic tiles, then it is necessary to use polystyrene as a heater, if the floor is wooden, then both polystyrene and mineral wool can be used.
1. To insulate the balcony floor with polystyrene, you need a 5 cm thick foam plate. PPT-25 grade (25 - foam density). Foam grades with a lower density will not work, for more information on brands see the article: "Polyfoam characteristics, advantages and disadvantages". For their laying on the balcony slab, it is necessary to lay a layer of waterproofing, which in this case can be a simple oilcloth. Next, the foam plates are cut to size and fit tightly on the surface of the oilcloth.
After the flooring, everything is poured with a cement-sand mixture with a thickness of 4 - 5 cm. It is possible to use various ready-made self-leveling mixtures, but they will be much more expensive at a price. After the screed has dried, the work of warming the balcony can continue.
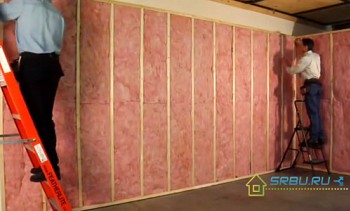
2. In the event that filling the screed with subsequent laying of the tile is not provided, then mineral wool can be used to insulate the floor. At its low cost, it has a long service life, and most importantly - excellent heat-insulating properties. Before starting its installation, it is necessary to waterproof the balcony floor. The most reliable and easiest way is to use hydroisol or ruberoid. Roofer sheets cut to fit the area you need overlap the entire floor. A wooden crate about 5 cm high is placed above the roofing material in order to put a heater in it. From above, it should look like several crossed bars.
On a concrete base, you need to firmly fix the wooden crate and level it with a level. For fasteners, long “roofing” self-tapping screws with a bolt head are best suited. Then fill the cracks with the mounting foam around the perimeter of the balcony, where the crate is adjacent to the walls.
Next, lay the insulation between the transverse bars. There should not be any gaps between the structure and the insulation. If nevertheless this happened - do not pull it, but carefully fill in all the joints at the installation foam. Using a special gun, make a stream of foam as small as possible.
Use a stapler and 10 mm staples to fix on top of the cotton wool, on the crate, a regular plastic film, preventing the cotton from getting wet. Then plywood or boards are stuffed onto the crate, on which you can lay anything. Finishing the floor can be done with linoleum, laminate, euroboard and even carpet.
This method of floor insulation is acceptable only in the area where winters are not very severe. The disadvantage of this method is that in this case, the bars of the crate are laid on the surface of the plate, which are wooden and have much greater thermal conductivity than insulation. As a result, the so-called “islands” of heat loss appear.

An example of insulation of a balcony floor with mineral wool.
Insulation of the walls of the balcony
Warming of balcony walls and parapets
The technology of wall insulation will also differ depending on the materials that will be used for finishing. Polyfoam is best suited for wall insulation, so we will consider how to insulate a balcony with foam.
1. Very often, PVC panels are used for finishing. Foam plates with special cement glue are fixed to the walls. To do this, glue is applied to the foam with a thin layer, glue is also applied to the ends of the sheet and the sheet is pressed against the wall. For a more reliable fastening, each sheet is fastened with several dowel-nails with wide hats (fungi). To do this, a hole is drilled with a drill with a victorious tip, then the dowel is inserted there and the nail is hammered.In this case, the dowel head should be slightly recessed into the foam.
After strengthening the insulation, with liquid nails we attach an additional heat insulator - penofol to it. For better thermal insulation, it is better to glue it in solid pieces. Next, the seams of the heat insulator are sealed with foil tape.

Penofol and fixed, on top of its crate.
After this, the fastening of the wooden battens begins, followed by the fastening of the finishing material. It is better if the thickness of the rails is from 3 to 5 cm - to preserve the usable area. We fasten rails using metal corners, which are fastened with dowels, nails and self-tapping screws. One end of the corner is attached to the bar, using a self-tapping screw, and the other to the wall using a dowel-nail. The slats are mounted at 35-40 cm from each other for a more reliable fixation of the structure. For more information about fixing the lathing and installing PVC panels, see the article: "How to fix plastic panels to the ceiling or wall correctly and without errors".
Note! In some materials posted on the Internet, it is proposed at the beginning to make a crate of bars and only after that, lay insulation between the bars. This method of insulation is not acceptable for the walls of the balcony, because in this case there are many islands of heat loss, due to the fact that the tree has a much higher heat transfer than insulation.
2. Some for finishing, prefer to simply paint the walls in any color. In this case, the crate is not needed. After the foam sticker the dowel caps are puttied with an adhesive compound that glued the foam. After they have dried, the same adhesive compositions, an reinforcing mesh is glued on top of the foam. To do this, the necessary piece of mesh is cut off and, using a spatula, glue is applied and evened with a thin layer on its surface, from top to bottom. As soon as the surface dries, another layer of adhesive is applied with a spatula. And only after complete drying, it is possible to putty with special putty, and then primer and paint.
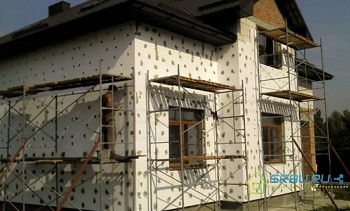
The warming of the parapet has its own characteristics. If there are gaps in the parapet of the balcony between the casing of concrete slabs, then blow them out with foam. The parapet is often reinforced with a timber frame or foam block masonry.
Since the parapet is located between the street and the balcony and is subjected to various temperature loads, it means that for its insulation it is necessary to use heaters that protect it as much as possible from heat loss.
If the parapet has not a concrete wall, but a metal structure, then it is best to use masonry of foam blocks of small thickness to warm it, and stick foam boards on it already.
In the case of attaching the foam sheets to the metal parapet, it is laid in two layers. At the beginning they make a crate. Foam plates are cut in such a way that between 0.5 and 1 cm space remains between the foam sheet and the bar. Next, we simply present the foam sheet and fill it with foam in a circle. Then a second crate is made. Moreover, so that the bars of the first lathing are not connected with the bars of the second. Then applying the mounting foam in zigzag motions along the already glued foam sheet, we glue it on its second sheet, and fill the cracks around the sheet with foam.
Below is a video which shows an interesting option for warming the parapet using masonry foam blocks.
Insulation of the main wall on the balcony
Often, insulation of the main wall is not required, because with high-quality insulation of balcony walls and the installation of plastic windows, the need for additional insulation is no longer needed. She can also pick up a usable balcony area of 50 mm. If you still want to insulate the main wall, then do everything by analogy with the balcony walls.
Balcony ceiling insulation
Insulating the ceiling is just as necessary as insulating the floor and walls.Styrofoam plates are best for insulating a balcony ceiling. One of the many advantages of this method is that the installation of these plates takes a little effort and time. The methods of warming the ceiling are similar to warming the balcony walls.
Finishing the balcony
Finishing, in addition to visual appeal, has a protective function, protecting the balcony from rain, wind and snow, but at the same time, without burdening the structure.
For the exterior of the parapet, sheets of corrugated board or plastic siding are often used. To mount the frame on the parapet, use 2 cm thick wooden slats. The frame needs to be fixed so that there is a groove between the ebb and the rail for a tight fit of the finishing material. Seams and joints of the balcony are treated with white sealant.
The interior decoration of walls, ceilings and parapets is very often done using PVC panels, see how to fix them in the article: "How to fix plastic panels to the ceiling or wall correctly and without errors". Some people prefer to simply paint the walls of the balcony after they have been puttied. This finishing method is not so practical in a sense, but it also has its advantages.
Carefully executed warming of the balcony will provide sufficient comfort in the resulting mini-room.
Video: Insulation of the balcony with polystyrene foam