Wallpapering is the most popular type of wall decoration. Wallpaper can be glued quickly and easily, this process is relatively simple and does not require any special skills or highly skilled craftsmen, but such a coating makes fairly high demands on surface quality.
Often the wall surface has to be pre-leveled using gypsum plasterboard lining, and only then the wallpaper is to be glued. Before gluing wallpaper on drywall, it is necessary to properly prepare its surface. In this case, it is very important to follow the procedure of operations described below.

Content:
Drywall surface preparation
Drywall preparation for wallpapering is carried out in stages. Each of these items must be performed without fail.
Primer
The application of a primer layer contributes to better adhesion of the putty to the surface of the drywall, and also protects the latter from the development of mold and fungus. The most commonly used acrylic primer, although some craftsmen prefer other types. The primer is sold both in finished form and in the form of compositions from which the working mixture needs to be prepared yourself. In the latter case, it is very important to strictly follow the instructions and the recipe offered by the manufacturer. Drywall primer for wallpaper is carried out using an ordinary brush, while the mixture is distributed over the entire surface of the wall as evenly as possible. When the entire wall is finished, you should pause, waiting for its complete drying. The time it takes for the primer to dry is indicated on the packaging.
Gluing of joints between gypsum plasterboards
Serpyanka is a polyester or fiberglass tape with an adhesive applied to its surface. Outwardly, it looks like a regular medical bandage. Serpyanka should be glued as tightly as possible to the joints between the sheets, avoiding the appearance of airbags. If the sickle does not stick well, you can add a small amount of PVA glue.
Putty joints
After gluing with a serpentine, the required amount of putty is laid in the seam, which is then leveled. Thus, the joint becomes invisible, merging with the overall surface of the wall. After smoothing the putty layer, after drying, it should be wiped with a sheet of sandpaper with fine-grained spraying.
Video: Putty plasterboard joints
Video: Putty of drywall trim seams
Drywall putty
Even if the wall seems perfectly flat and smooth, it is necessary to putty it before gluing the wallpaper onto drywall. Sticking wallpaper on drywall without putty can lead to the fact that the entire wall will have to be re-faced again. After all, sooner or later the time will come for a new repair, when the wallpaper will need to be removed from the wall. If they are glued directly to drywall, they will “grab” a cardboard sheet covering. In this case, damage to the gypsum core itself is not excluded. In addition, on light wallpaper after drying, seams between drywall sheets may appear. Thus, the appearance of the walls will be hopelessly ruined and all the work will have to be redone.
A cement or gypsum based putty mixture can be prepared by yourself (the composition and method of preparation are given in reference books and on the Internet), or can be purchased ready-made. Two types of putty are sold in stores: starting and finishing. The first allows you to quickly and accurately smooth the surface of the wall, the second - as the name implies - serves for the final finish, gives the surface a special smoothness and removes minor defects. The solution is prepared in a fairly capacious container with added water. To obtain a high-quality homogeneous mixture, it is better to use a construction mixer.
Drywall putty for wallpaper is carried out using three spatulas. One - the smallest - is used to take putty from the tank, the other two (40 and 60 cm long) - for applying and leveling the solution. The master makes long and even circular strokes, holding the instrument at an angle of 45 degrees. The putty layer must be uniform, its thickness is from 1 to 2 mm. After applying and smoothing the next portion with a small spatula, remove the remaining solution from the large one and repeat the operation from the beginning. Upon completion of the wall decoration with a starting putty, it is not out of place to primer its surface again. Do not worry about small defects, such as pronounced strips of putty mortar. They will be eliminated during the next step.
Putty grout
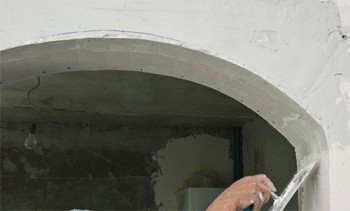
After drying, the putty must be sanded with sandpaper. First, grout with coarse paper, then fine-grained. This work requires great care and special attention, it must be done carefully and without haste. Careless movement can lead to the formation of chips, as a result of which the work of filling the wall will have to be started anew. Keep in mind that grinding putty is accompanied by the formation of a large amount of fine and very corrosive dust. Therefore, before starting work, care should be taken to protect the eyes and respiratory tract using personal protective equipment.

Grinding of the puttied surface of the wall. Photo - bellaidea.es
Primer
Before you paste the wallpaper on drywall, it is necessary to put a primer on the putty layer. Wallpaper is glued to the primed surface more qualitatively and does not lag behind after drying. At the same time, the primer layer prevents the base from absorbing the adhesive too actively. Experts recommend applying a primer in two layers. In this case, the second layer is applied only after the first is completely dry.
Drywall Wallpapering
First of all, before gluing the wallpaper, vertical marks are applied to the wall corresponding to the width of the roll. This marking helps to determine the total number of rolls, and also facilitates the gluing of wallpaper cuts. If a pattern is applied to the surface of the wallpaper, adjacent sheets must correspond to each other, otherwise vertical joints between the sheets will be noticeable.

Drawing horizontal marks on the walls. Photo - diynetwork.com
Particular attention should be paid to the instructions for the preparation of glue. Usually it is indicated on the packaging composition. In most cases, the glue preparation process does not cause any difficulties, however, it is very important to correctly observe the ratio of the amount of powder base to water. People often ask: “Is it possible to glue wallpaper on drywall immediately after the glue is prepared?” No, in this case, one should not rush. The finished solution should stand for a while until the reaction is complete.
Wallpaper glue is best applied with a roller. First, the glue is applied to the inner surface of the wallpaper, and then the wall is rolled in the place where the canvas will be glued. Now the canvas can be glued. To do this work alone is almost impossible, so before starting work, get an assistant. The sheet must be glued from top to bottom, leveling it from the center line to the edges.When the sheet is completely glued to the wall, it must be carefully smoothed with a rag, removing the formed folds and air bubbles underneath. Sheets need to be glued without an overlap, only butt. Particularly careful and careful should be in the corners of the room. The wallpaper canvas is first glued in the corner (starting from the top), and only then on the adjacent wall.
Like any aqueous solution, wallpaper glue is able to conduct electricity. Electric shock when wallpapering is not so rare. Therefore, before starting work, be sure to turn off the power to the room.
Video: How to quickly and accurately glue wallpaper