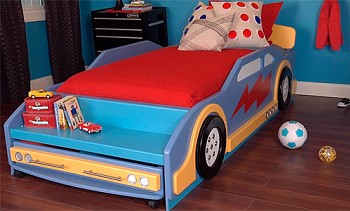
Build, with your own hands, for small members of your family, an attic bed with a working area. Color the bed in your favorite colors and it will turn into a place of fun games and sweet dreams!

Content:
Tools and materials
Tools:
- Circular Saw;
- joiner's square;
- jigsaw;
- cordless drill;
- bits for twisting screws;
- 6 mm and 10 mm drills;
- countersink;
- eccentric sander and disks for it 120 grit;
- putty knife;
- roulette;
- grinding sponges of medium and fine grit;
- clamps.
Materials:
- lumber (see the list and the cutting scheme in the Appendix);
- 30 mm flat head screws;
- nuts diameter 6.35 mm, thread 16;
- bolts, diameter 6.35 mm, thread 16;
- grit sandpaper 100;
- wood putty;
- wood glue;
- Valspar paint;
- masking tape.
The cost of tools and materials may vary depending on where they were purchased.
Application. Project Plan - Baby Bed Attic


Sawing blanks
Step 1
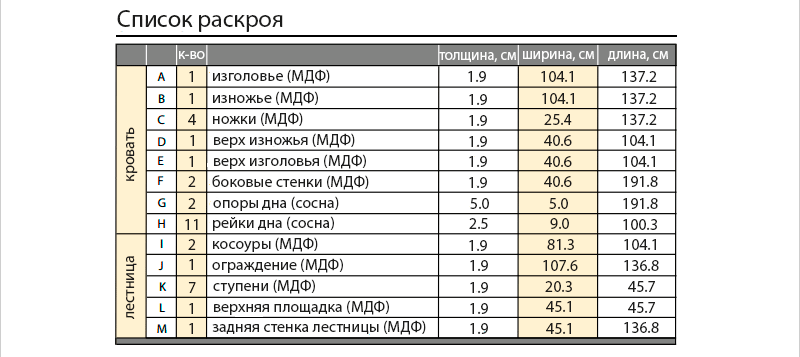
Using a circular saw and a guide, cut out two sheets of medium density MDF (or chipboard) needed to make the front and rear walls of the bed (headboard A and footboard B) of size (Appendix, cutting pattern). Make the necessary cutouts in the backs (Appendix, Figure 1).
Step 2
To make a round cut, drill a circle drawn from the inside of the MDF sheet from the inside, (touching its edge), a 10 mm starting hole. From this point, use a jigsaw to cut a circular hole with a diameter of 76.2 cm.
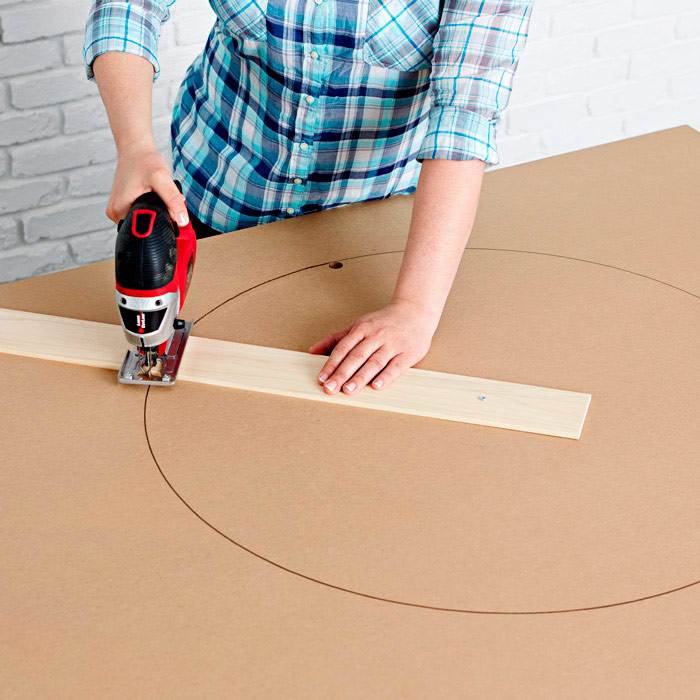
Tip: To make the round neckline perfectly smooth, make a device to direct the movement of your jigsaw. Fasten one end of the rail at least 90 cm long with a nail or a screw on the MDF sheet in the center of the circle. Measure 38.1 cm (circle radius) from the nail and fix the jigsaw at this point on the rail. Insert the jigsaw blade into the drilled start hole. Work slowly, allowing the guide rail to set the path of the jigsaw.
Step 3
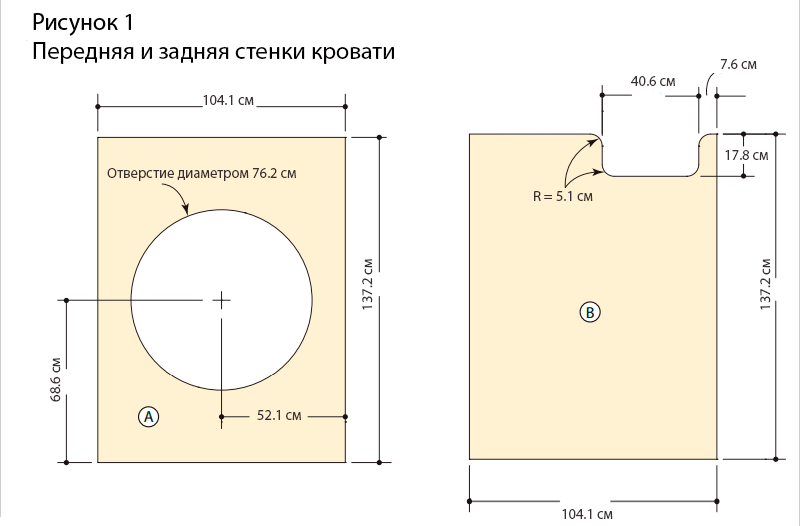
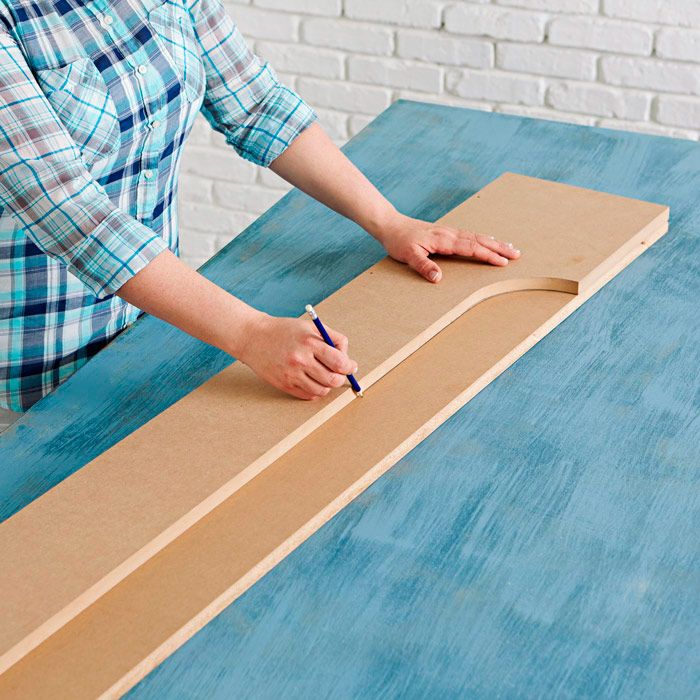
Saw the workpieces for the legs (C), the upper parts of the foot (D) and the head (E), as well as the side walls (F). Having cut out one of the legs, use it in the future as a template for making the rest (Appendix, Figure 2).
Step 4
Sand the sawn blanks with 120 grit sandpaper to prepare them for assembly.
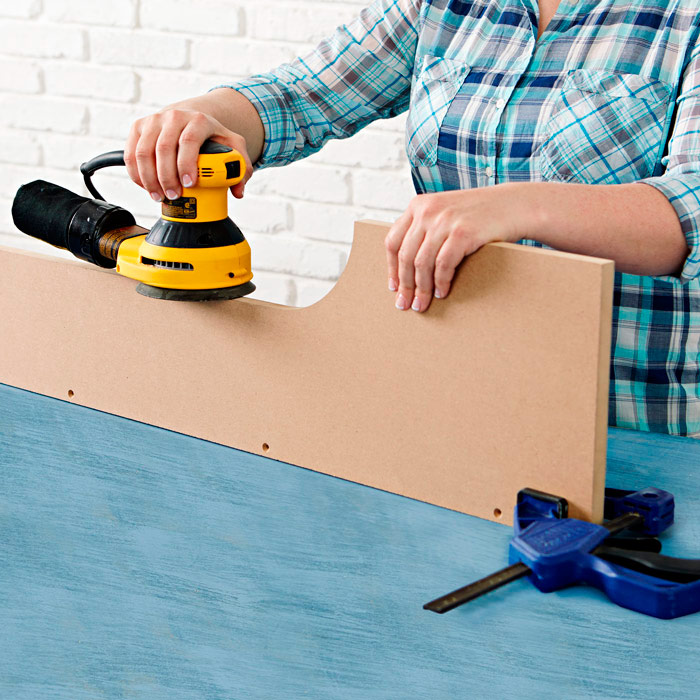
Tip: There are several tricks to polishing workpieces more efficiently. When processing curved sections, an eccentric sander will be very useful, which will help make the bends smoother. In the case of curves whose radius is too small to be machined by a grinder, wrap sandpaper around a metal rod of circular cross section and use it to grind. Be sure to sand the straight ends of the panels and flat surfaces.
Bed assembly
Step 1
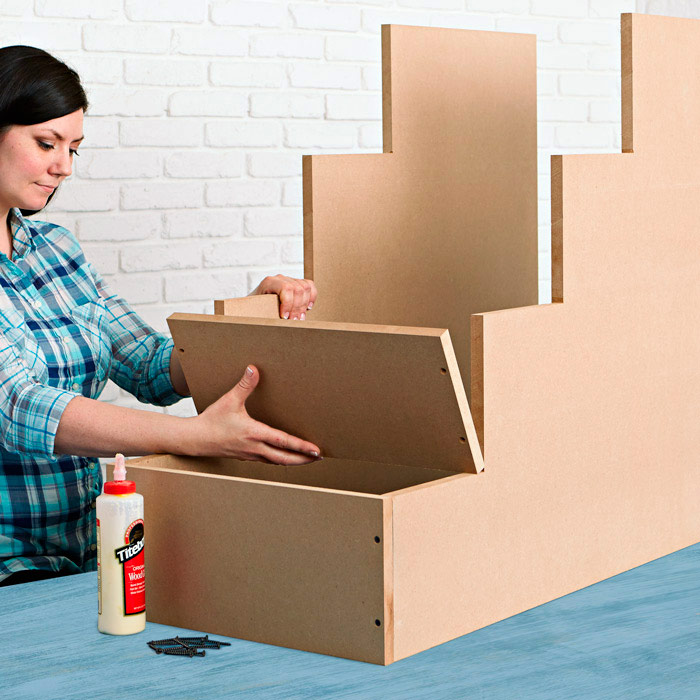
Drill guide holes and countersink them. Using glue to improve the bonding quality of individual elements, assemble the front and back walls of the bed (Appendix, Figure 3). When assembling you will need clamps.
Step 2
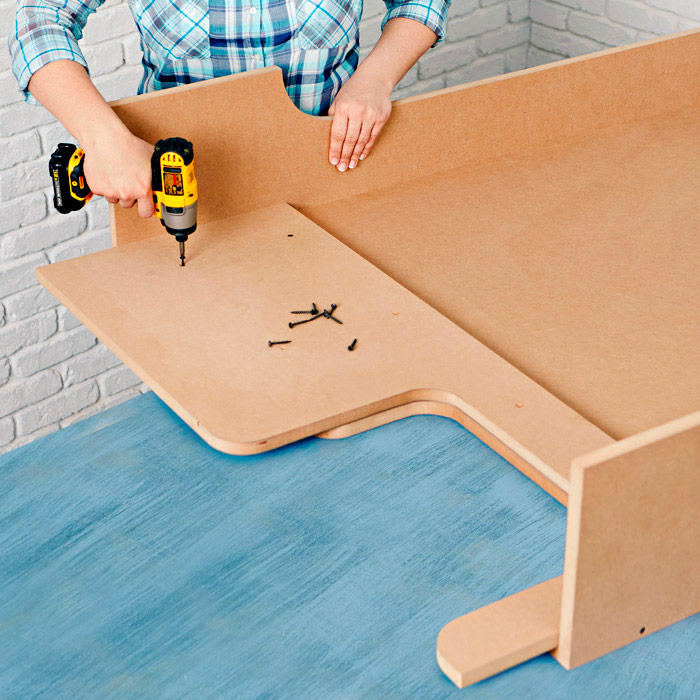
Using glue and screws, attach the upper parts of the front and rear walls of the bed (D and E) to the already assembled units (Appendix, Figure 4). These parts should protrude 12.7 cm above the upper edges of the front and rear walls.
Step 3
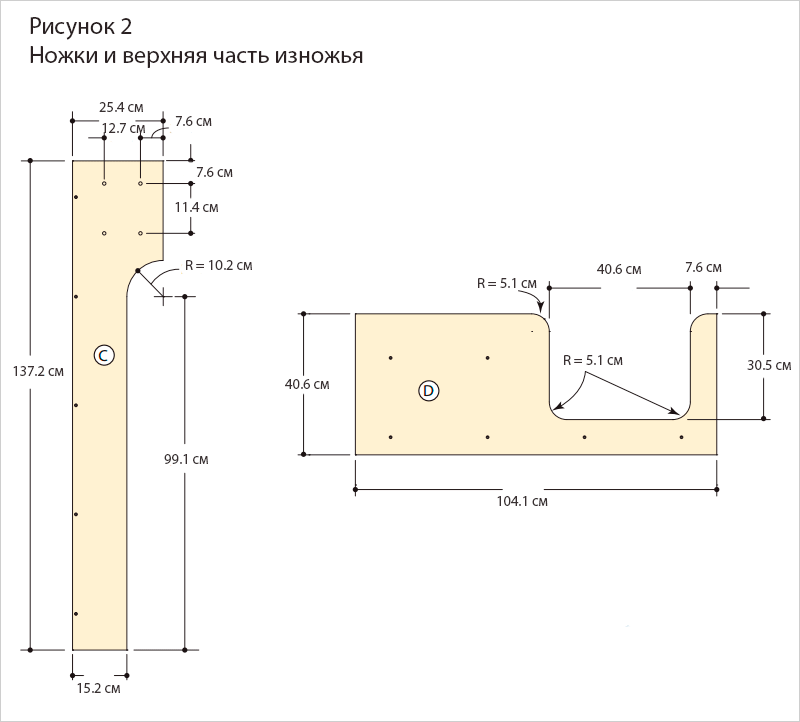
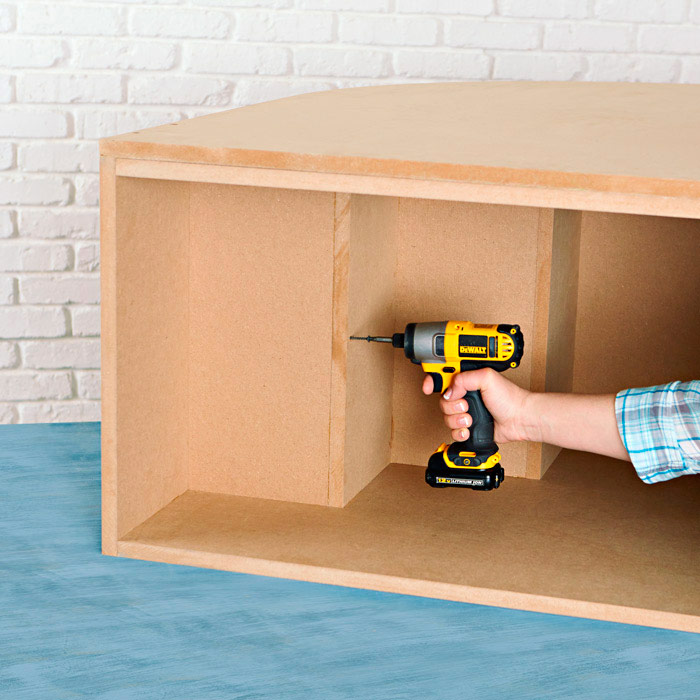
Saw out two bars with a cross section of 5x5 cm, which will serve as supports for the rack bottom (G), as well as eleven 2.5x9 cm of planks (H) - the rack bottom itself will be made of them (Appendix, cutting list). Using glue and 50 mm screws, fasten the supports along the lower edges of the side walls (F) (Appendix, Figure 5).
Step 4
Place the sides (F) between the front and rear walls of the bed and fasten them with clamps (Appendix, Figure 4). At this stage, you can not do without an assistant. Do not use glue to connect them!
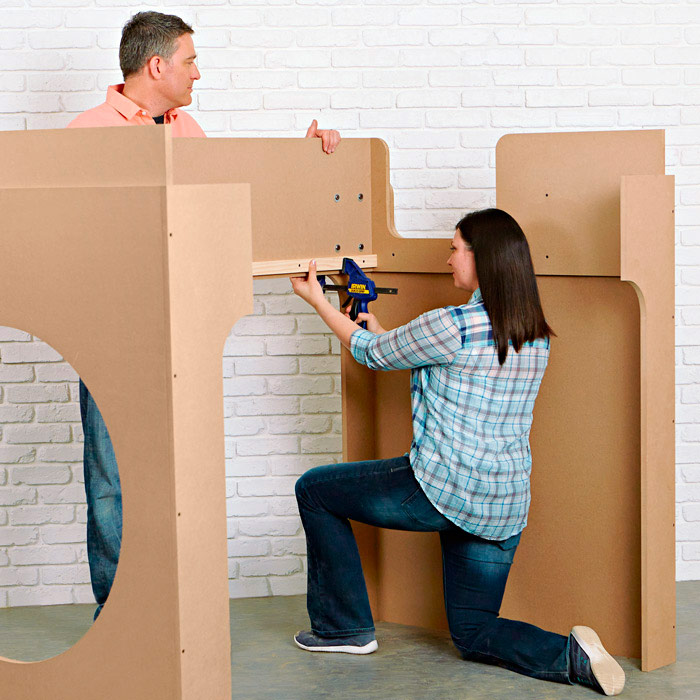
Step 5
Drill 10 mm holes through the sidewalls (F) and the legs (C). These elements will be fastened using a bolted connection (Appendix, Figure 4), so that the finished bed can be easily disassembled for transportation.

Step 6
Position the rails (H) on the supports (G) (Appendix, Figure 5). Secure them with self-tapping screws, having previously drilled the guide holes. The rack bottom will also be disassembled for transportation, so glue is not needed here.
Stairs
Step 1
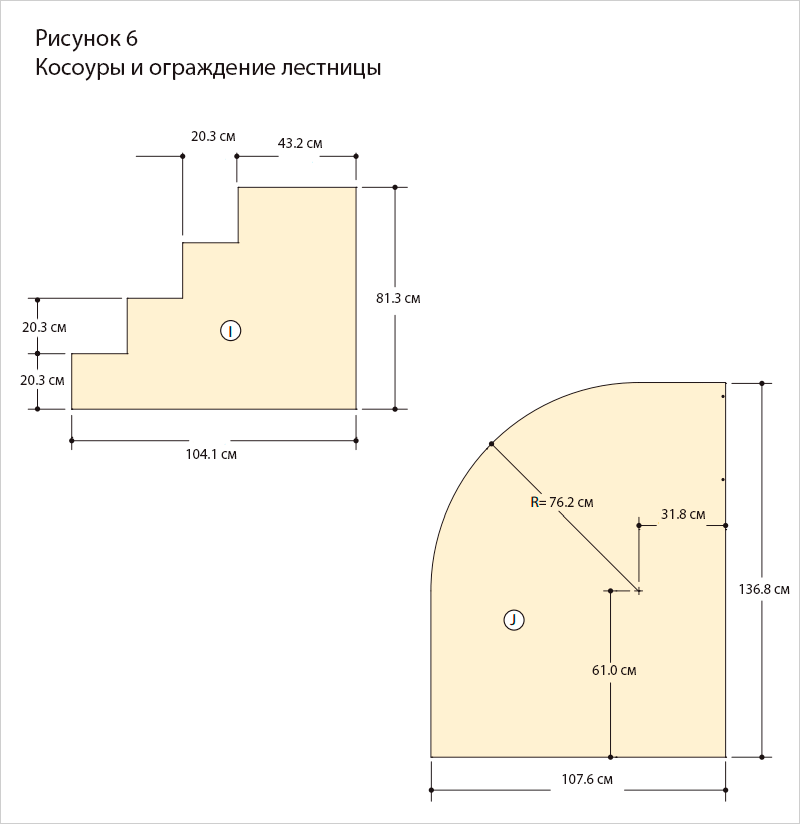
When creating a staircase, you will have to do the same operations as in the construction of the bed itself: sawing out parts of the right size from a large sheet of MDF or chipboard, cutting curly elements with a jigsaw, grinding and assembling. Start by cutting the load-bearing sidewalls (I) and the guards (J) (Appendix, Figure 6).
Tip. When the stairs are assembled, the braids (I) will be hidden. With this in mind, it makes no sense to exert too much effort to make them perfectly smooth and neat. In the manufacture of the fence (J), you can use the same guide rail that you used when cutting a round hole in the head (A).
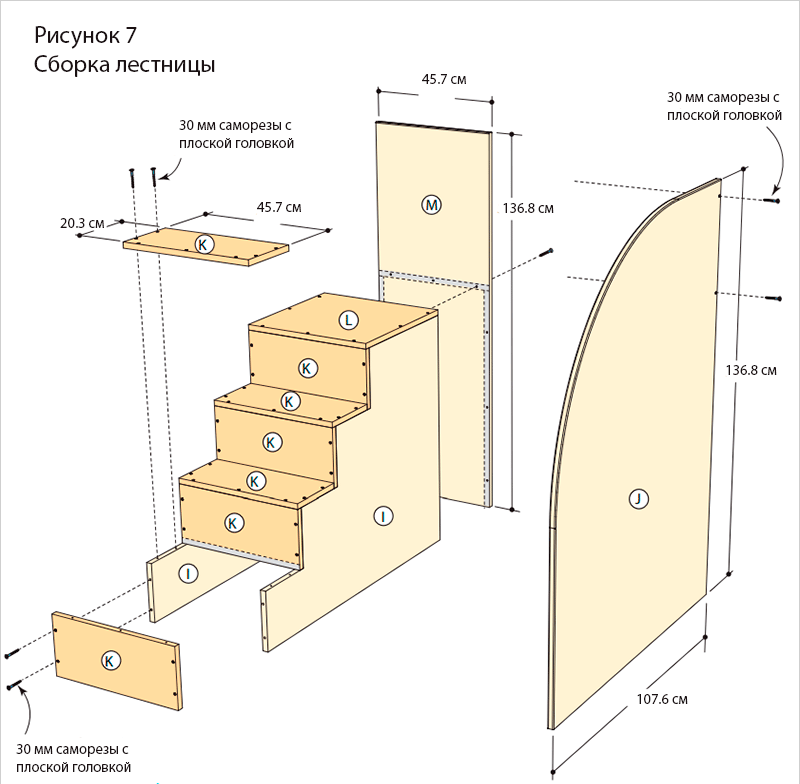
Step 2
Saw the blanks for the steps (K), the upper platform (L) and the back wall of the stairs (M) from the MDF (Appendix, list and nesting scheme). Grind all sawn fragments before assembly.
Step 3
Using glue and screws, attach the risers and steps (K) to the braids (I) (Appendix, Figure 7).
Step 4
Using glue and screws, secure the upper platform (L) to the stairs (Appendix, Figure 7).

Step 5
To strengthen the ladder, lay it on its side and fasten the risers with steps with screws (Appendix, Figure 7).
Step 6
Attach the back of the stairs (M) and the guard (J) (Appendix, Figure 7). Use adhesive and self-tapping screws to secure the back wall. Fix the guard without using glue so that it can be easily removed at the stage of painting the stairs (when the details of the stairs are painted, put the guard in place using both glue and screws).
Final stages of work
Step 1
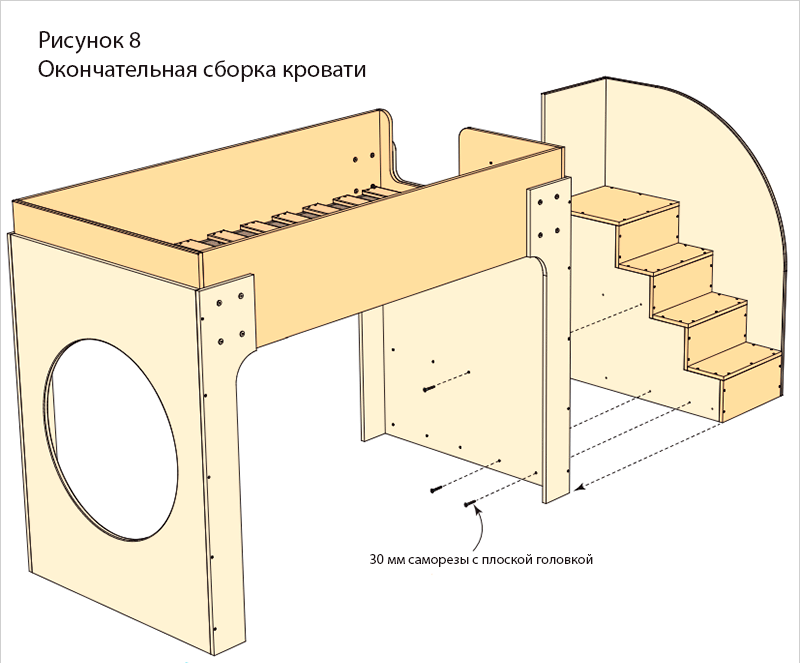
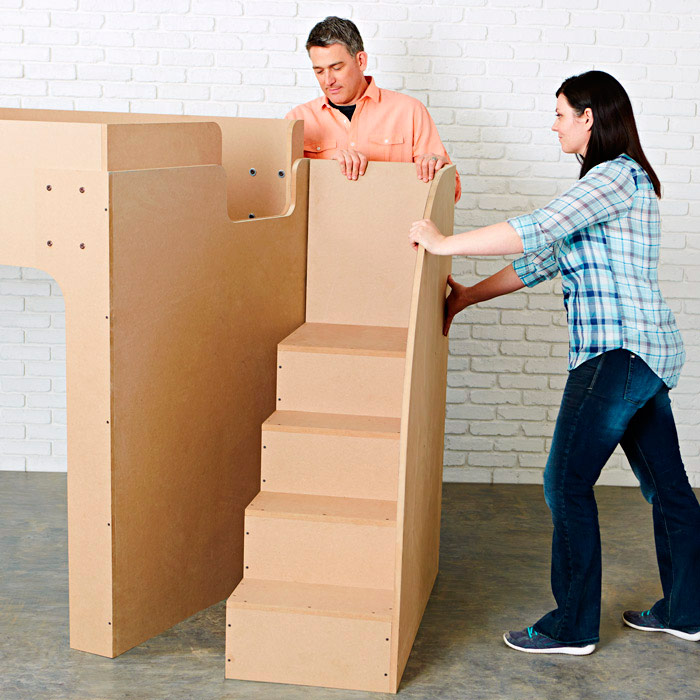
Slide the assembled ladder into its place (Appendix, Figure 8). The connection is carried out without the use of glue: during transportation, the ladder will move as a separate component. Self-tapping screws are screwed through the wall of the bed into the left kosour stairs.
Step 2
Detach the ladder, rack bottom (H), and side walls (F) to disassemble the bed. Smooth all sharp edges of parts with 100 grit sandpaper.
Step 3
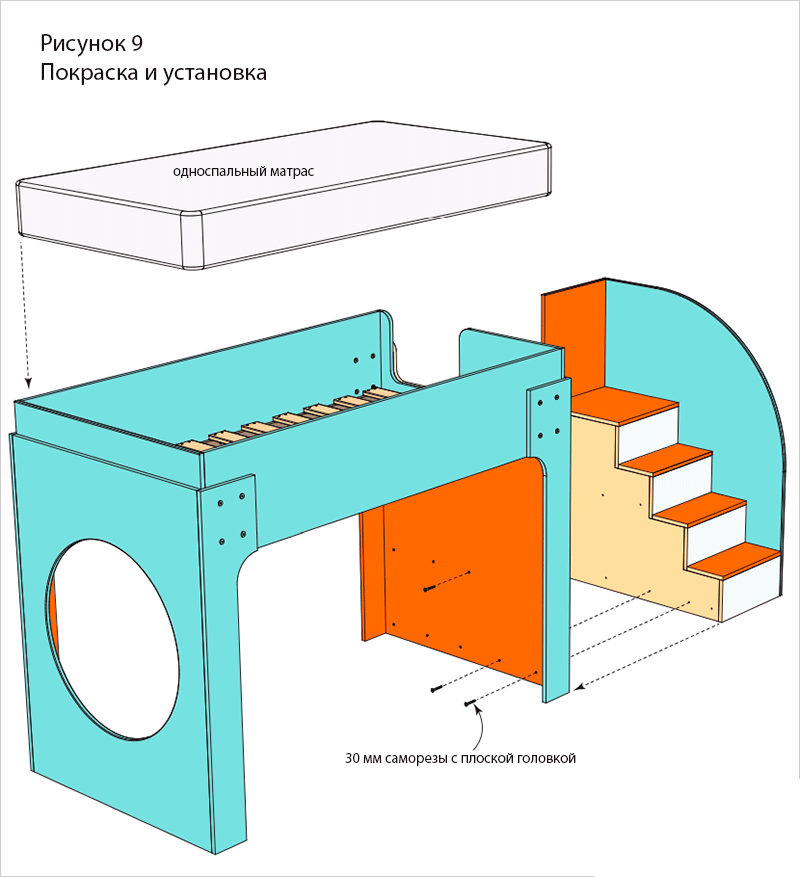
Prime and paint the surface, choosing the color of your choice. Sand the surfaces after priming and after applying the first coat of paint using medium and fine sanding sponges. This operation will allow you to get rid of microroughness and color inhomogeneity (especially at the edges) and will guarantee a smooth surface after applying additional layers of paint.
Step 4
Move the bed to its permanent place and proceed to final assembly. Fasten the sides (F) with the front and back walls, for which you will have to re-engage a partner.
Step 5
Secure the previously removed rack bottom (H) and ladder (Appendix, Figure 9).
That's all ... Be proud: you made a crib bed with your own hands. To complete the picture, it remains to add a mattress, a set of bed linen and ... of course, children.