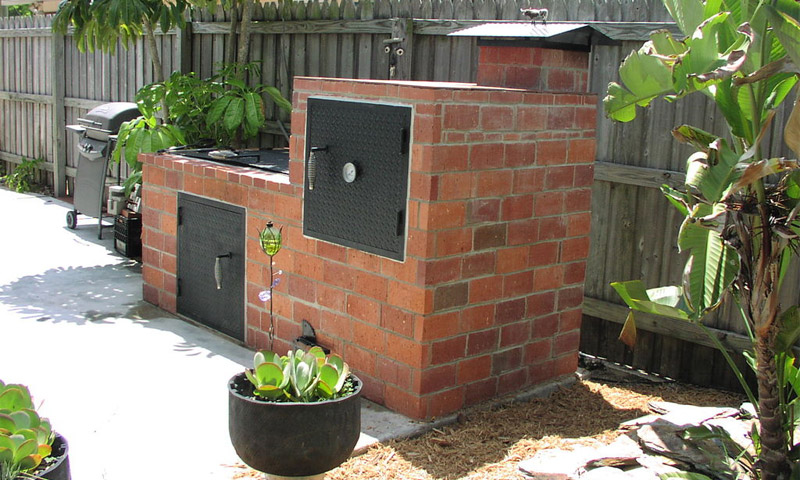
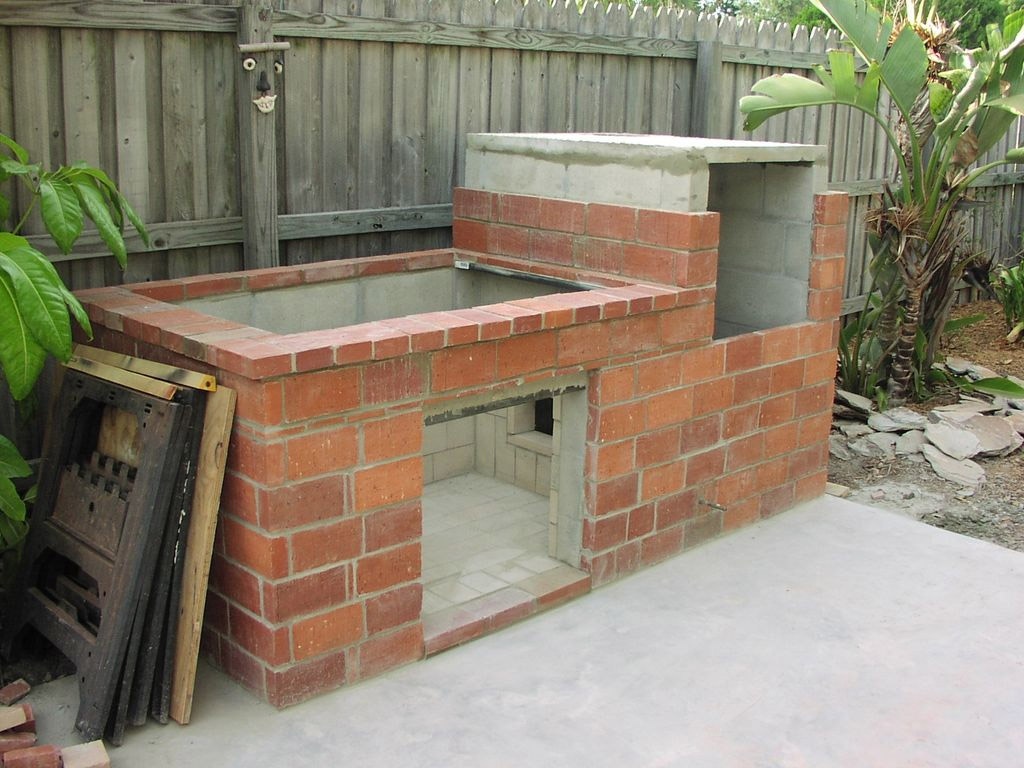
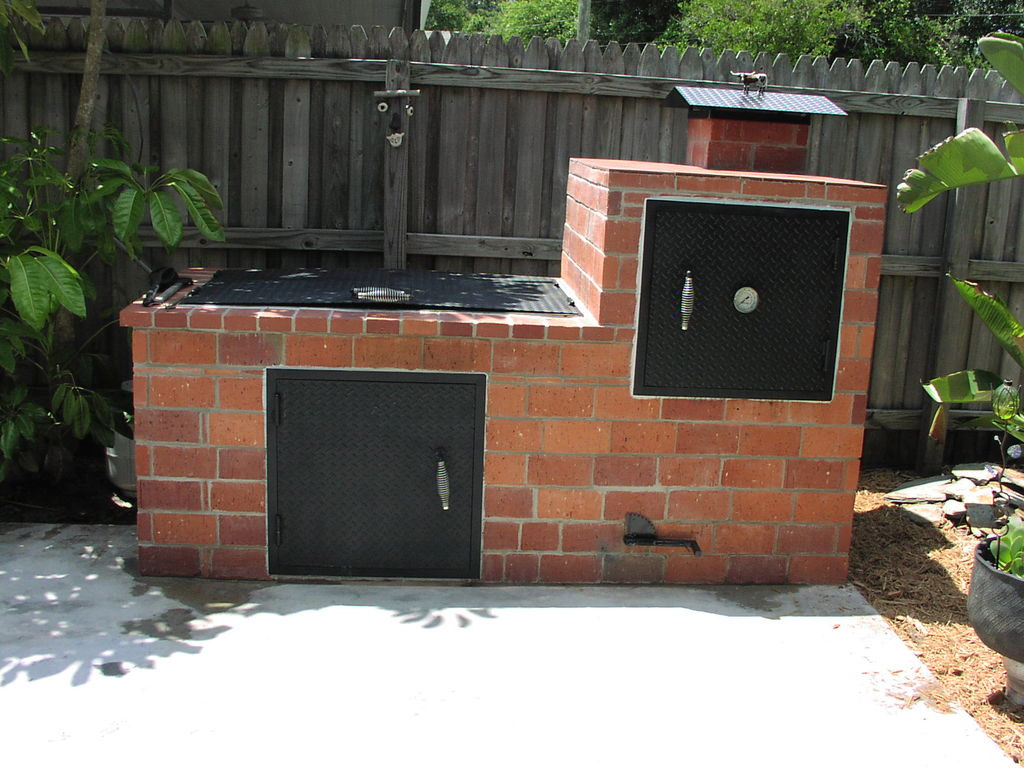
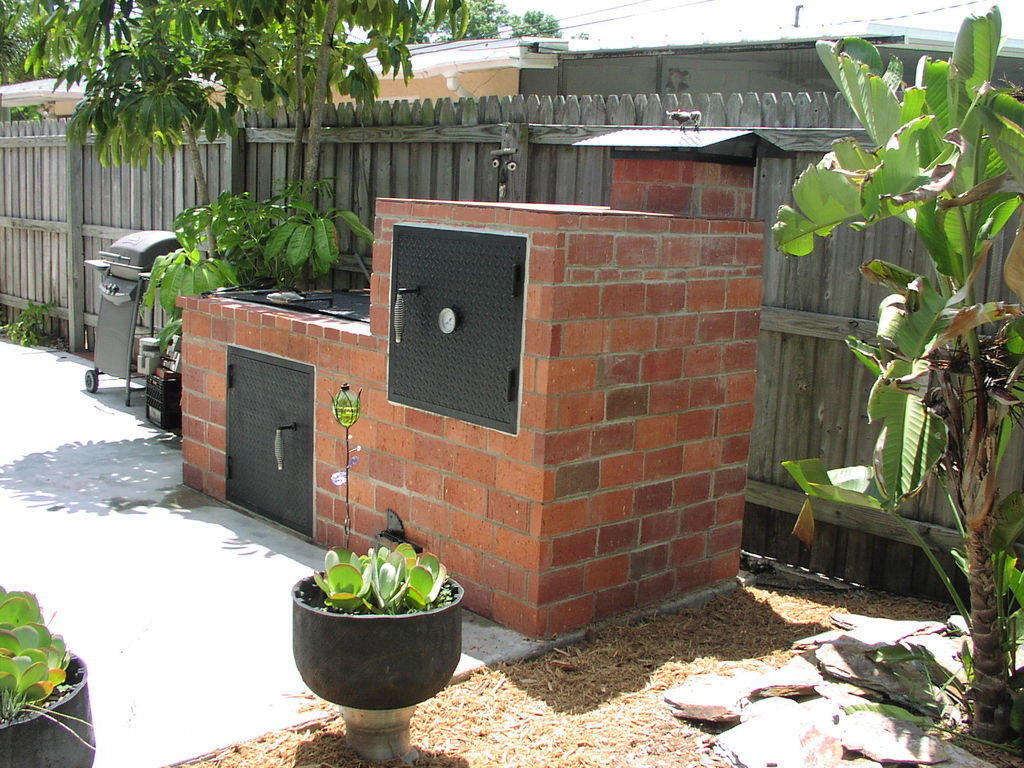
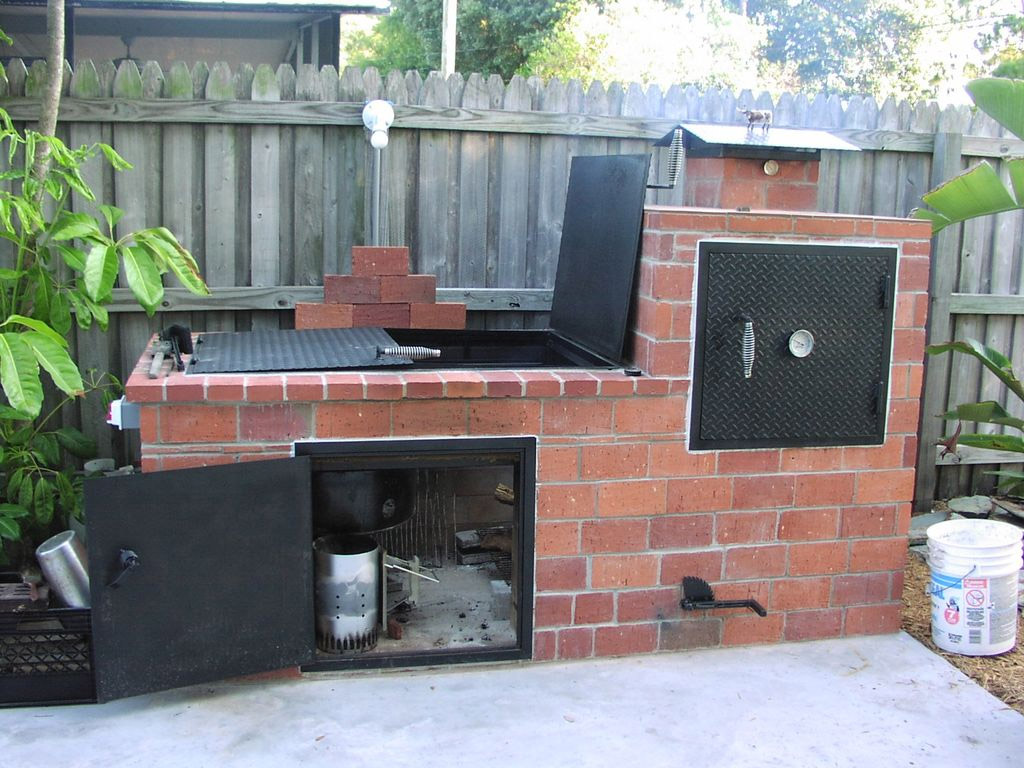
How to make a barbecue from a brick with your own hands? With some skills and the right tools at hand, you can easily do this! We present you another project for the construction of a brick barbecue. This time, with a large bonfire bowl and a smokehouse on the right side (a place for grilling is about 110 cm in length and 75 cm in depth; a smokehouse is 75 cm in depth, 70 in width and 75 in height).
We advise you to follow our example and pick up the tools. This material will help you in your work, in which you will learn how to make a barbecue out of brick with your own hands, and the diagrams, drawings and photos that accompany it will make the presentation more understandable. No doubt you will like to build a roasting pan and cook food on it.
Content:
- Step 1: Pouring the concrete site is a good reason to build a new barbecue!
- Step 2: Pouring the Concrete Site
- Step 3: The day after pouring
- Step 4: first row of masonry
- Step 5: Second Row
- Step 6: third row of masonry
- Step 7: Fourth Row
- Step 8: building a smokehouse
- Step 9: Refractory Brick Lining
- Step 10: Jumper over the door leading to the bonfire bowl
- Step 11: Red Brick Facing
- Step 12: More Bricks!
- Step 13: Smokehouse Concrete Roof
- Step 14: Finish Finishing
- Step 15: How to do without steel? hm?
- Step 16: Car Jacks and Steel Drum ... Why Not!
- Step 17: Grill Grates
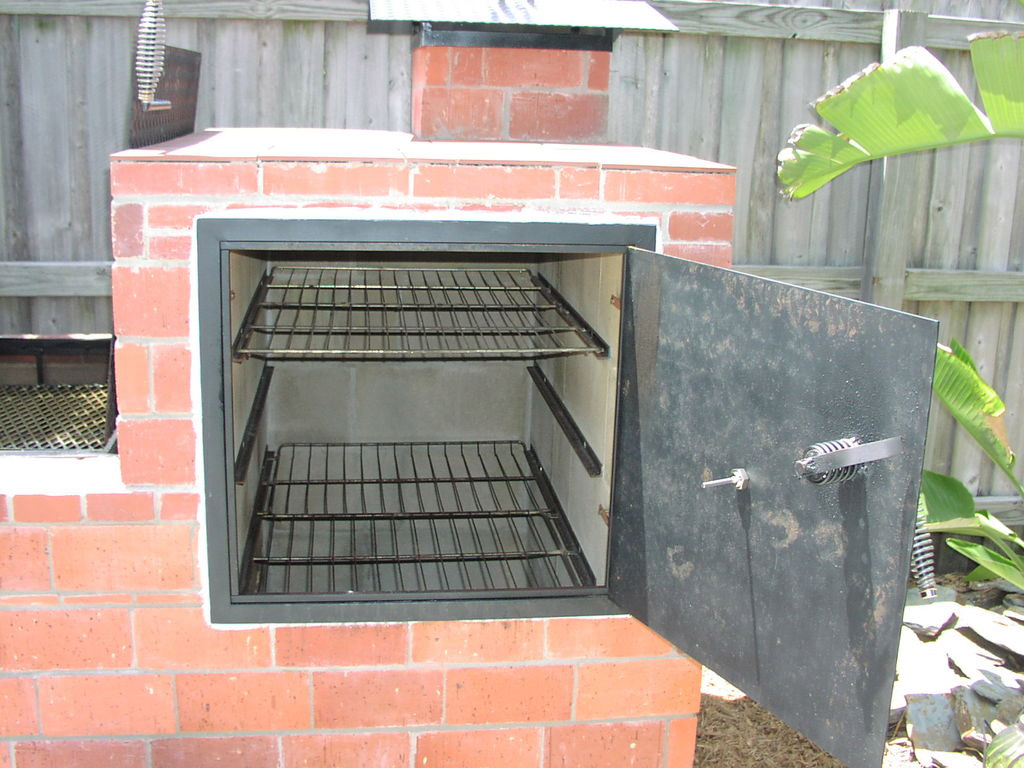
- Step 18: Smokehouse
- Step 19: Damper
- Step 20: Testing
- Step 21: BBQ Master
Step 1: Pouring the concrete site is a good reason to build a new barbecue!
When I was about to pour concrete over the area to equip the patio, I thought, why not build a new brick barbecue at the same time. I set to work and installed several pieces of fittings at the site of the planned construction of the brazier.
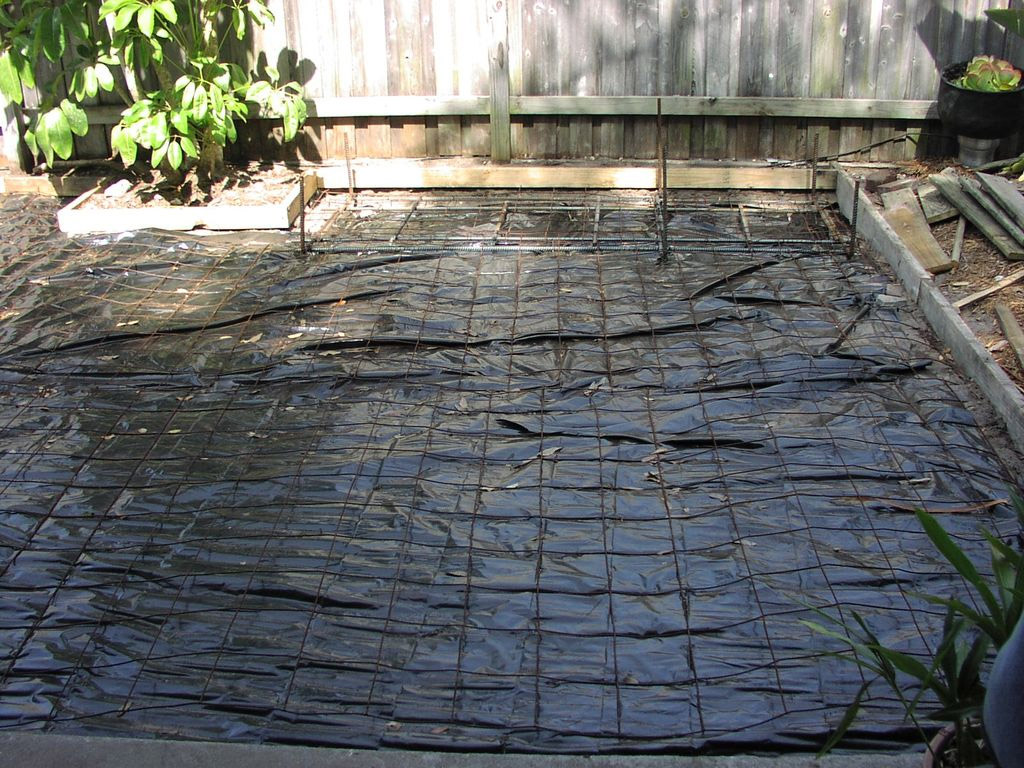
Step 2: Pouring the Concrete Site
Despite the fact that I checked and double-checked the correct location of the fittings several times, I was still a little nervous. However, it is too late!
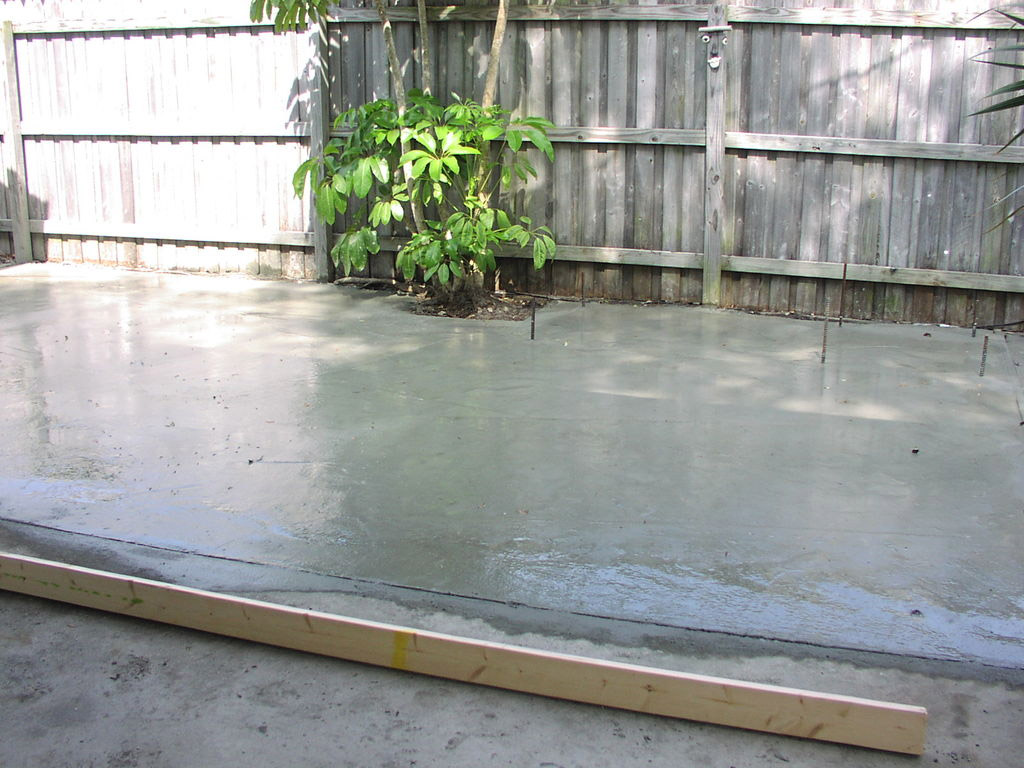
Step 3: The day after pouring
Concrete has not yet set. I can only look from the side. I want to make sure once again that the amplification is done in the right place.
Step 4: first row of masonry
I laid the first row of 10 cm concrete blocks, trying to place them exactly both vertically and horizontally (as far as possible, of course).
Step 5: Second Row
When the second row of masonry was almost finished, my son decided to contribute to the project. We came up with a form for supporting bricks, which came in handy for us to create a jumper. I realized our idea by making a narrow, long box of plywood. Subsequently, we placed vertical pieces of reinforcement there and poured concrete into the mold, making sure there were no air bubbles inside.
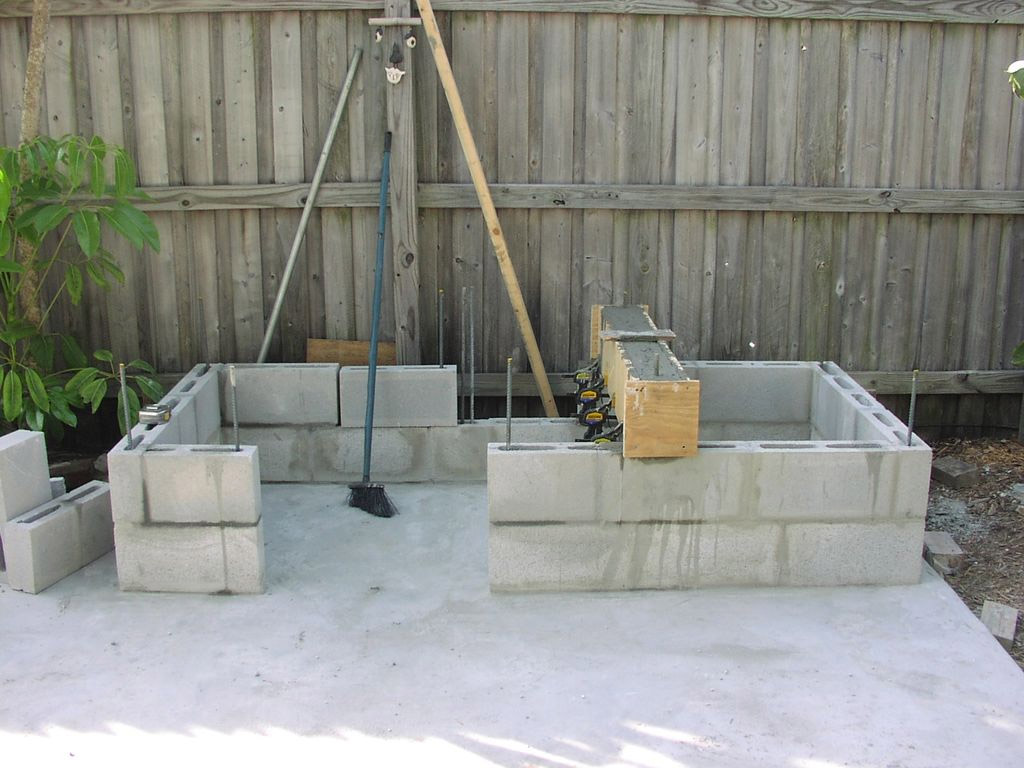
Step 6: third row of masonry
The jumper was ok. She served as the beginning of the third row of masonry.
Note: I now filled all the locations of the reinforcement on every second row of masonry with masonry mortar.
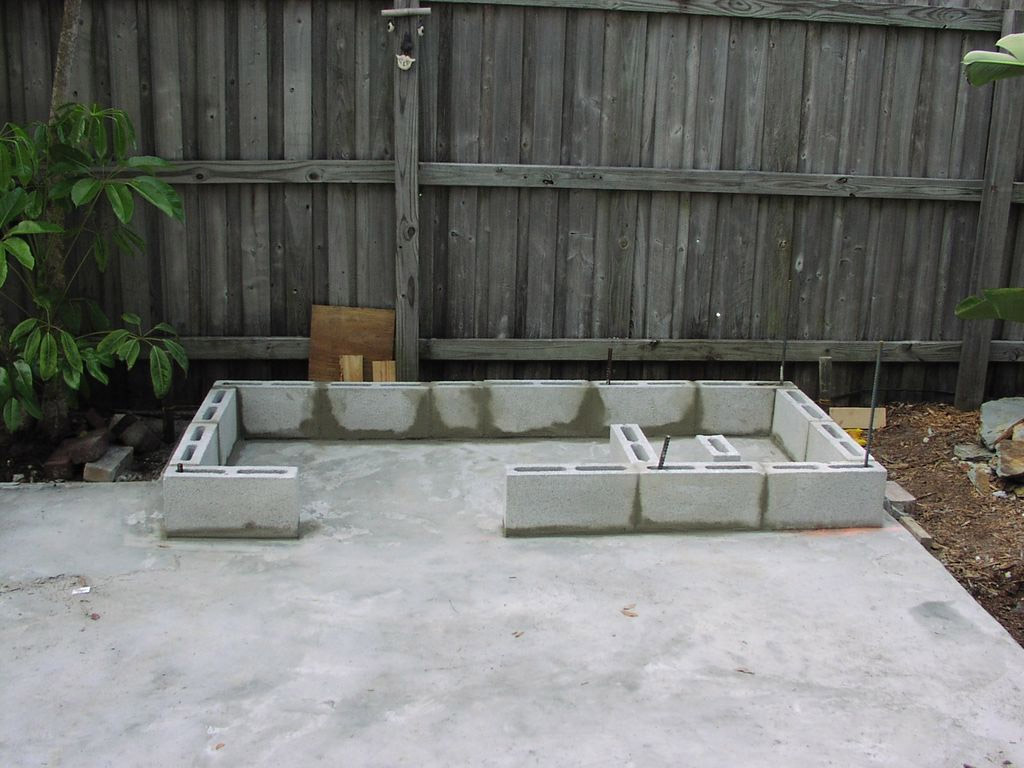
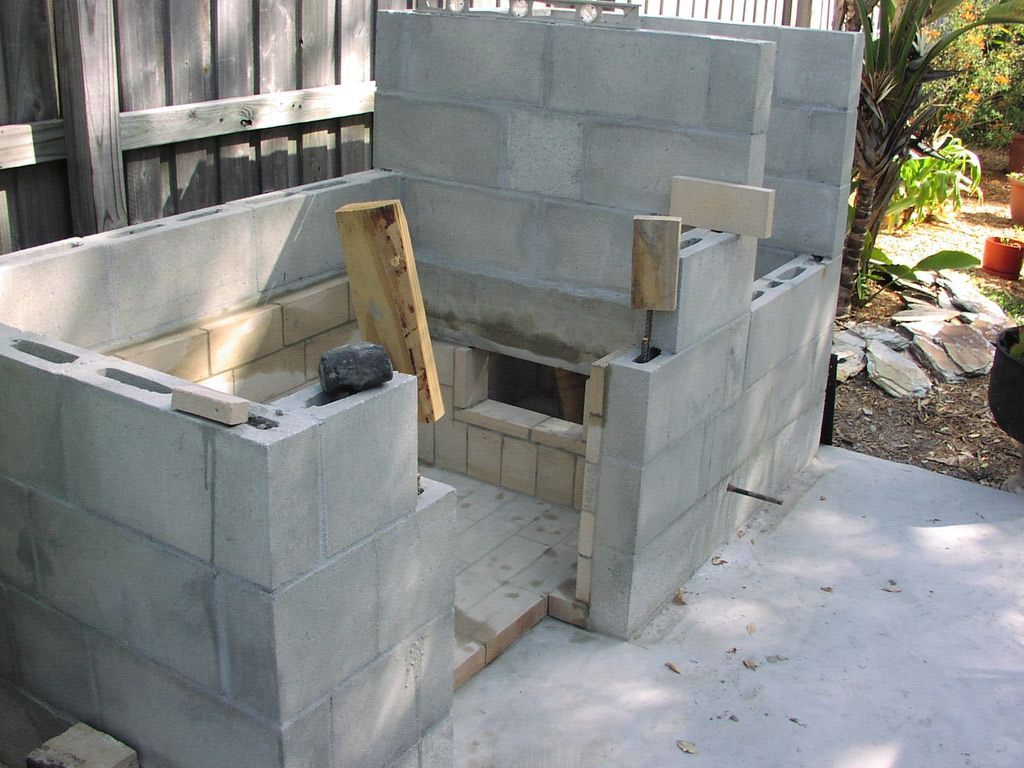
Step 7: Fourth Row
Laying the fourth row, I still tried to make sure that the walls were even in all three directions.
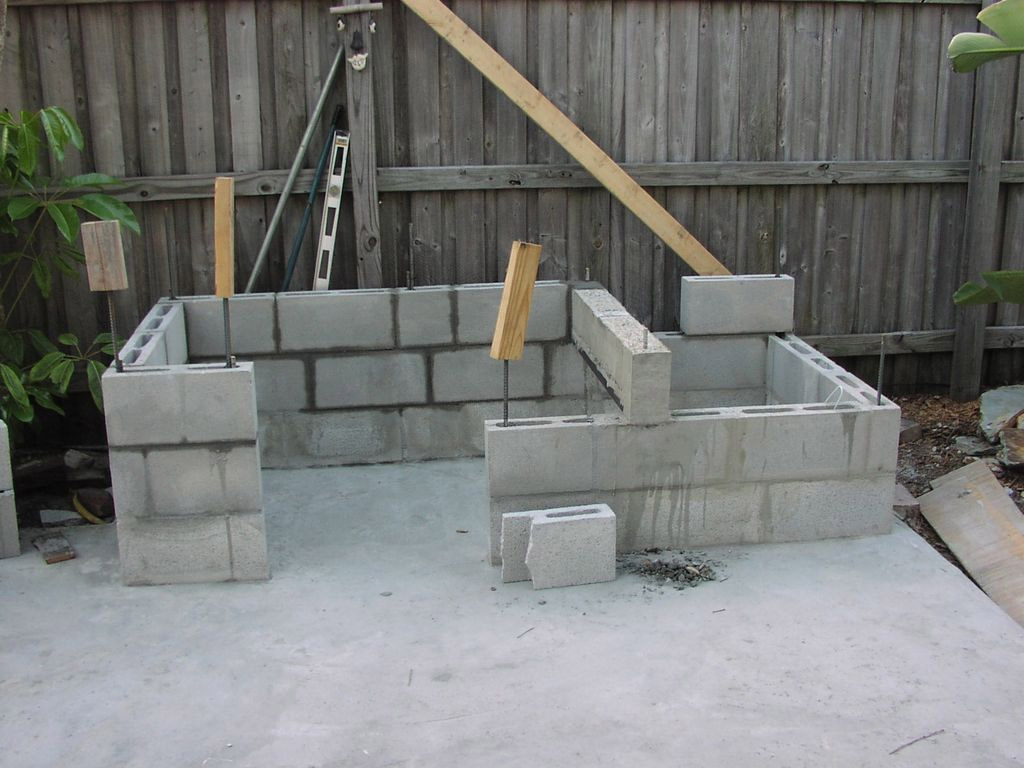
Step 8: building a smokehouse
The next two stacked rows of blocks formed the walls of the smokehouse. As before, the cavities at the points of passage of the reinforcement in each second row were filled with masonry mortar. When the refractory bricks are laid, you will need to make another partition in the form of a solid horizontal block.
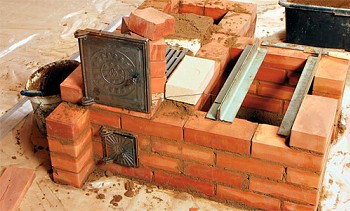
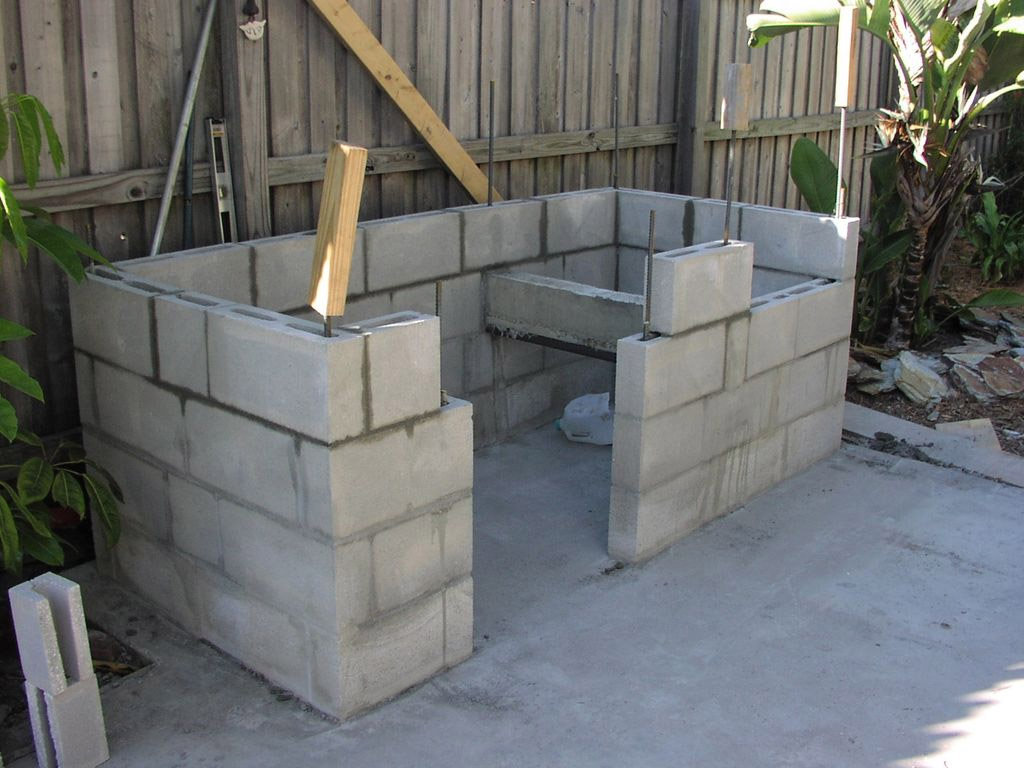
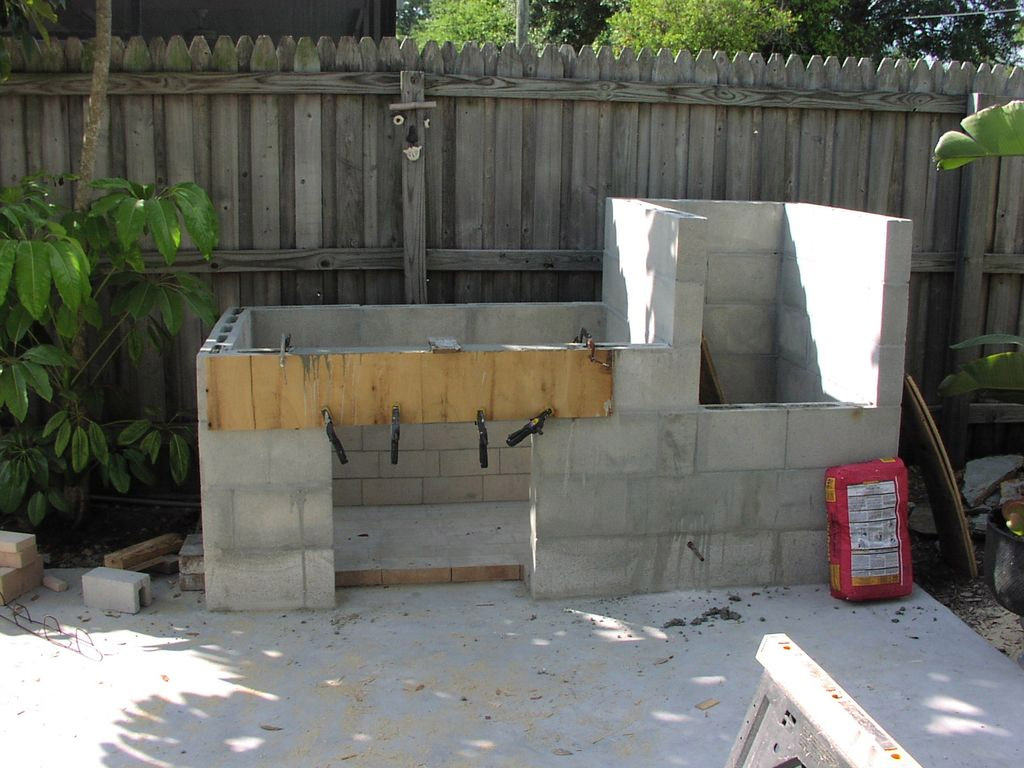
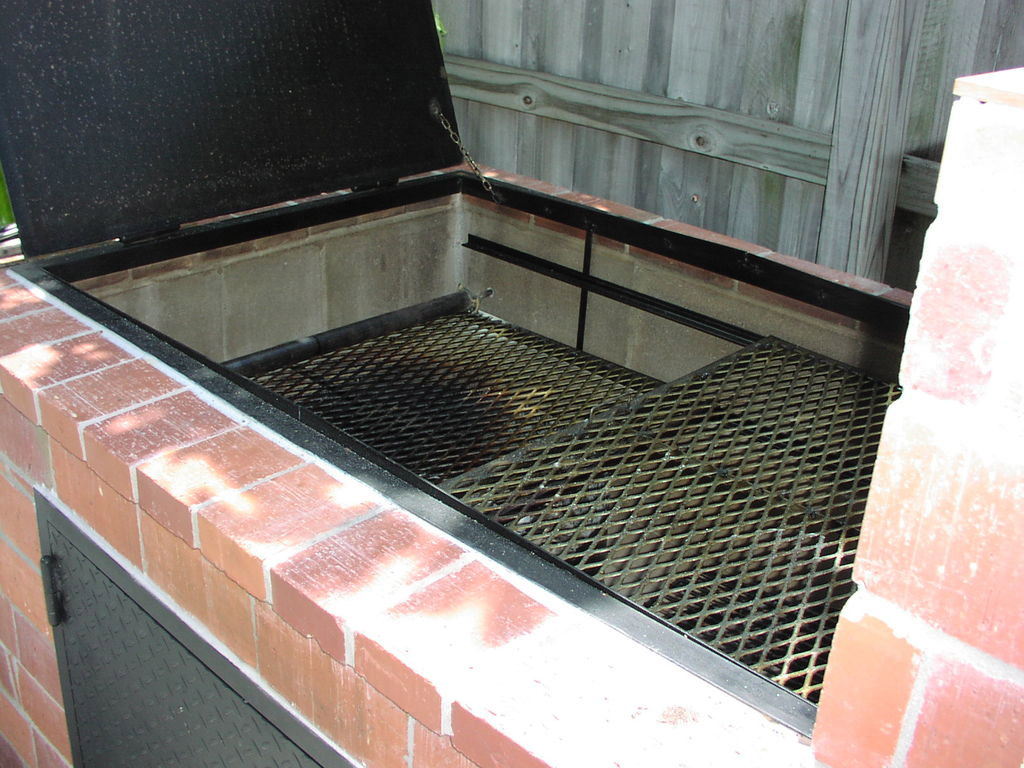
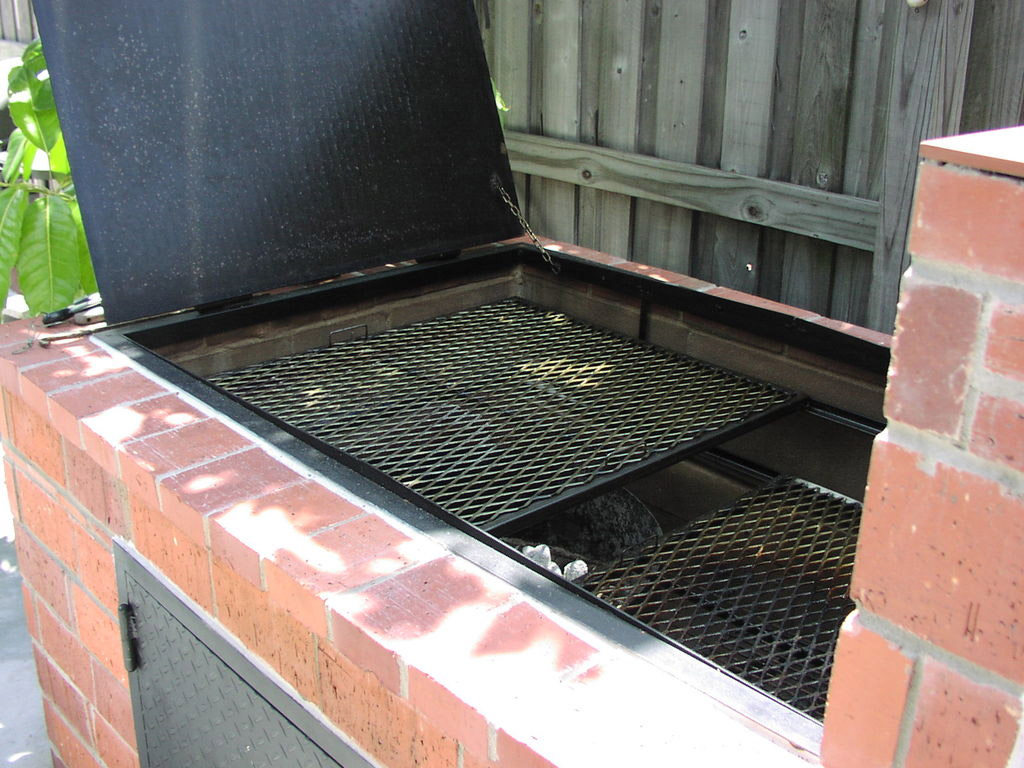
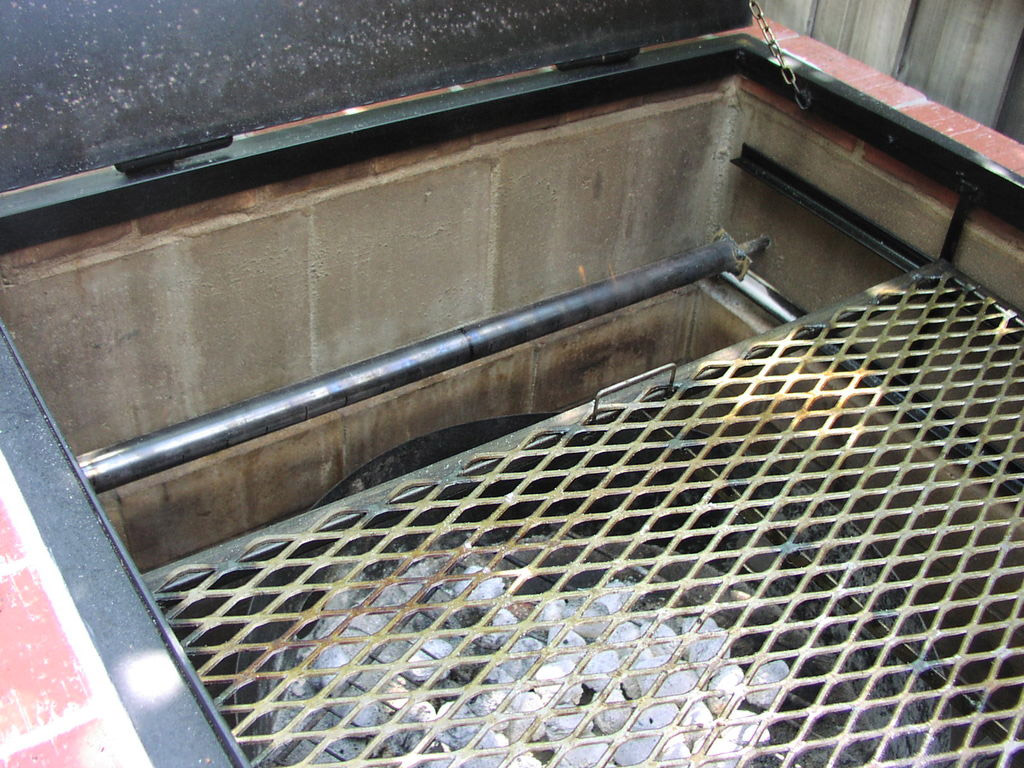
Step 9: Refractory Brick Lining
I bought a standard size refractory brick and used it to create the floor of the campfire bowl. The 3 cm thick refractory brick purchased at the same time went to the facing of its walls.
Note: for laying refractory bricks, I used a mixture of 36 kg of pre-prepared cement mortar and 1.4 kg of refractory clay.
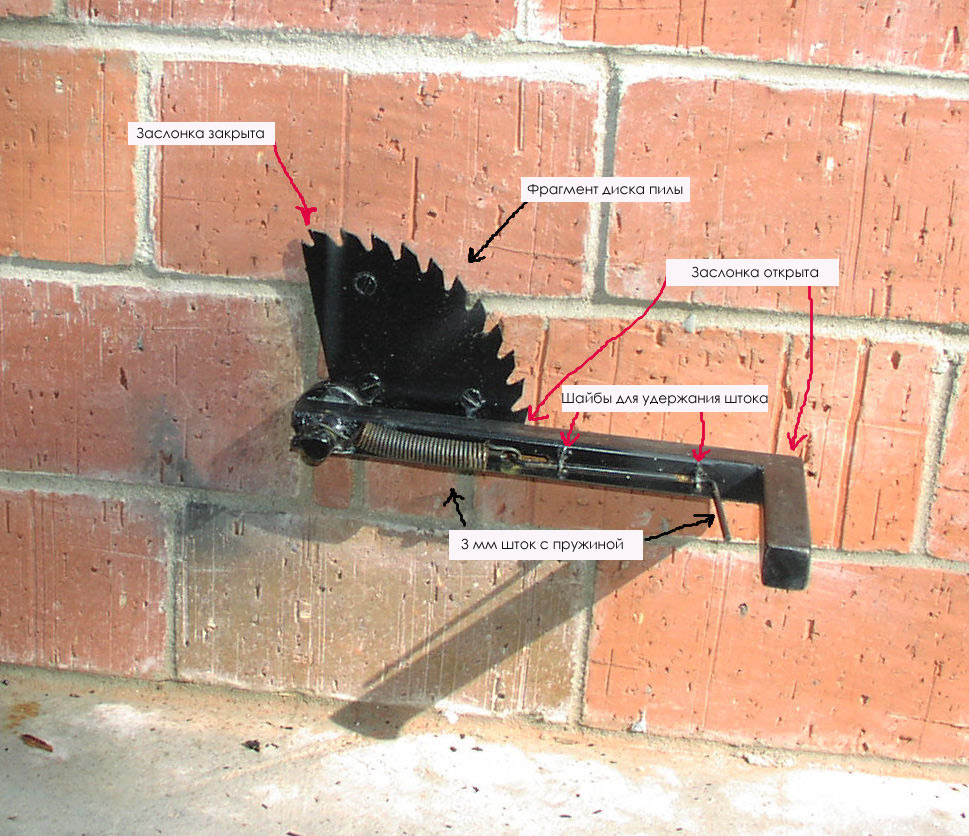
At the same time, I became concerned about the creation of a smokehouse opening system. I installed a strong rod with a diameter of 1.3 cm, the end of which protrudes from the front wall. Then I welded a steel plate to the rod, which will serve as a smoke damper.
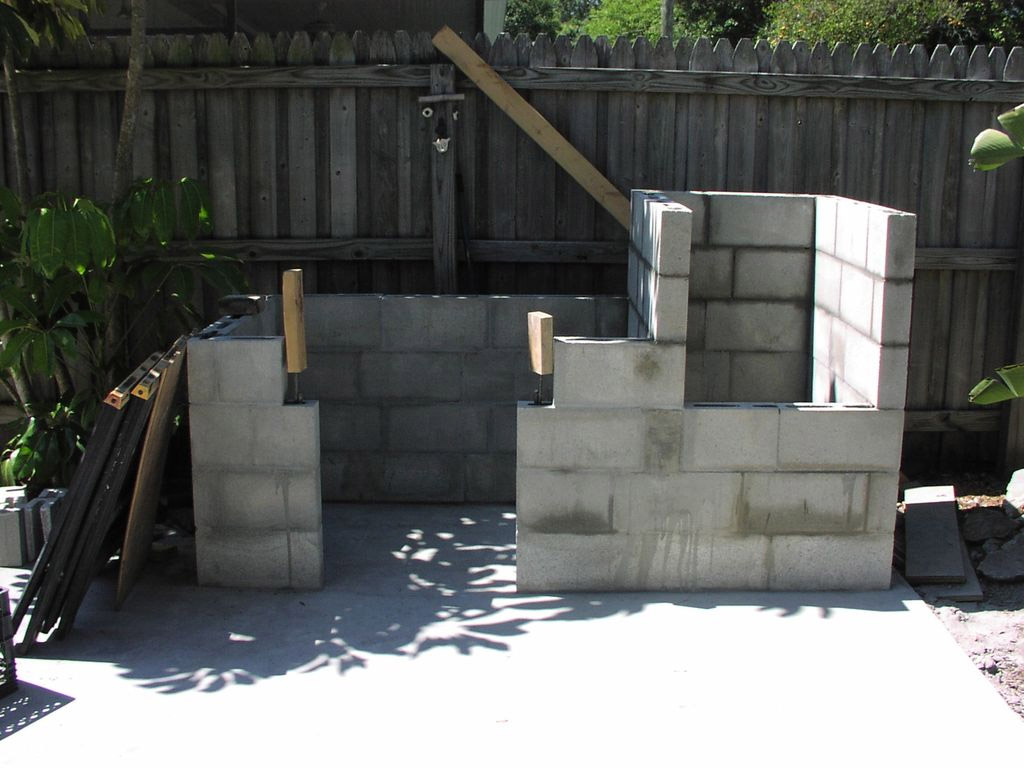
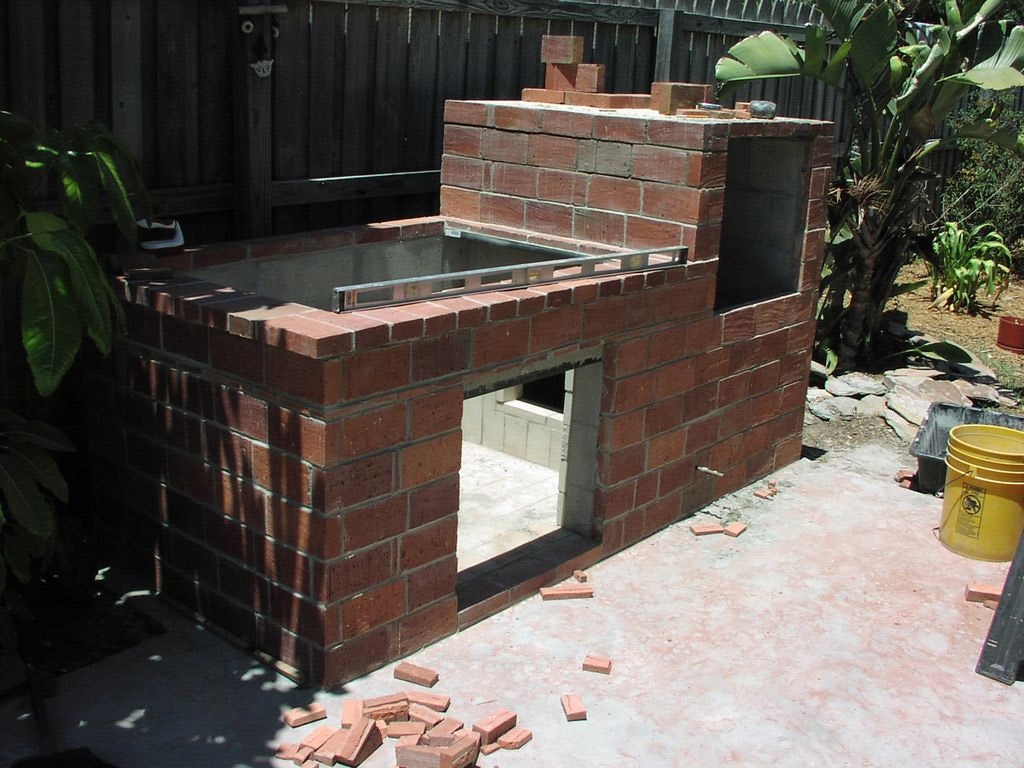
Step 10: Jumper over the door leading to the bonfire bowl
I again needed a form made of plywood, between the walls of which I clamped refractory bricks and fixed the fittings, and laid a wire mesh on the bottom. He poured concrete cement, waited for it to dry, and the partition was ready. Simply and easily!
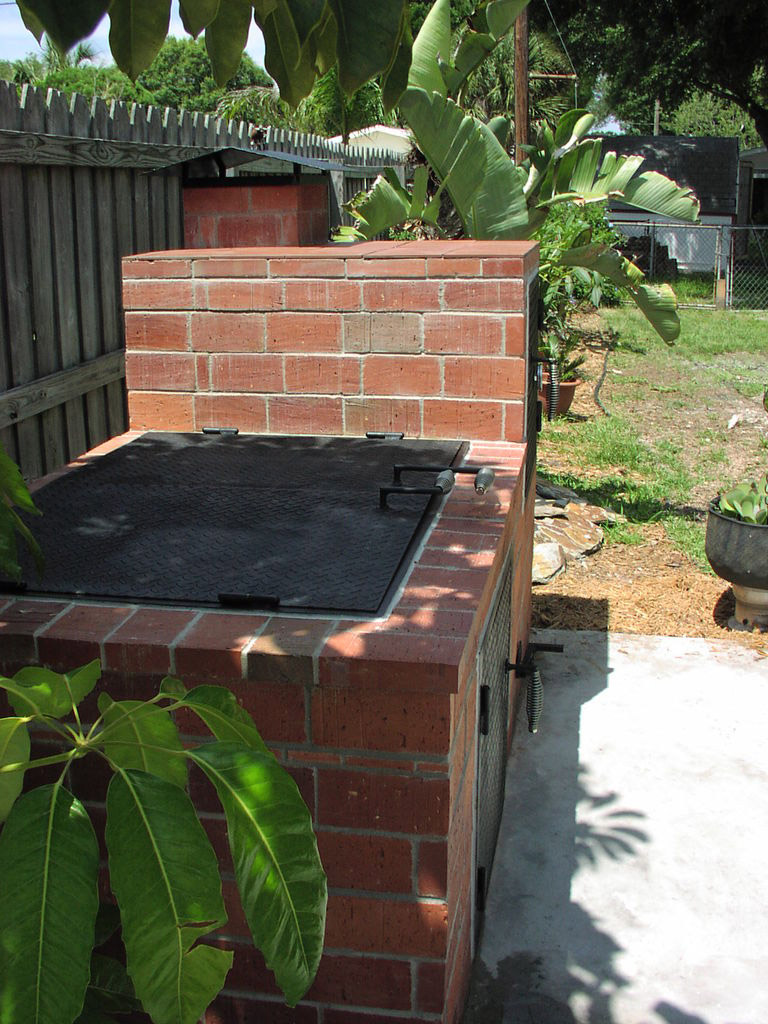
Step 11: Red Brick Facing
I am in a good mood - today I managed to get a good batch of red brick on the cheap.
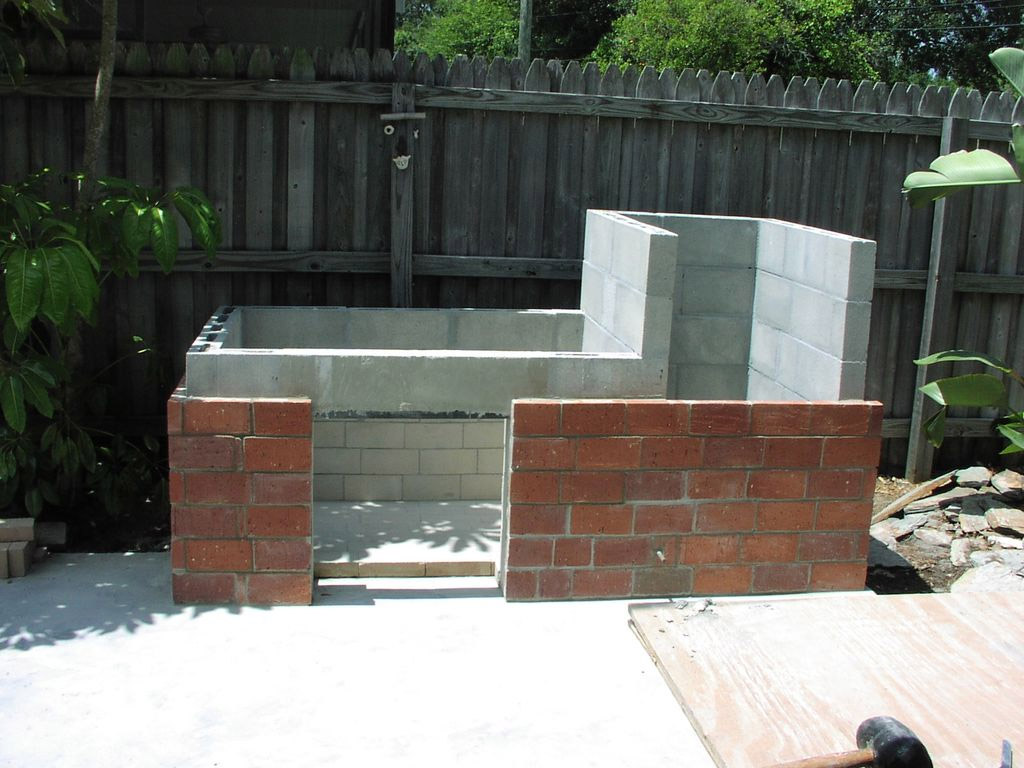
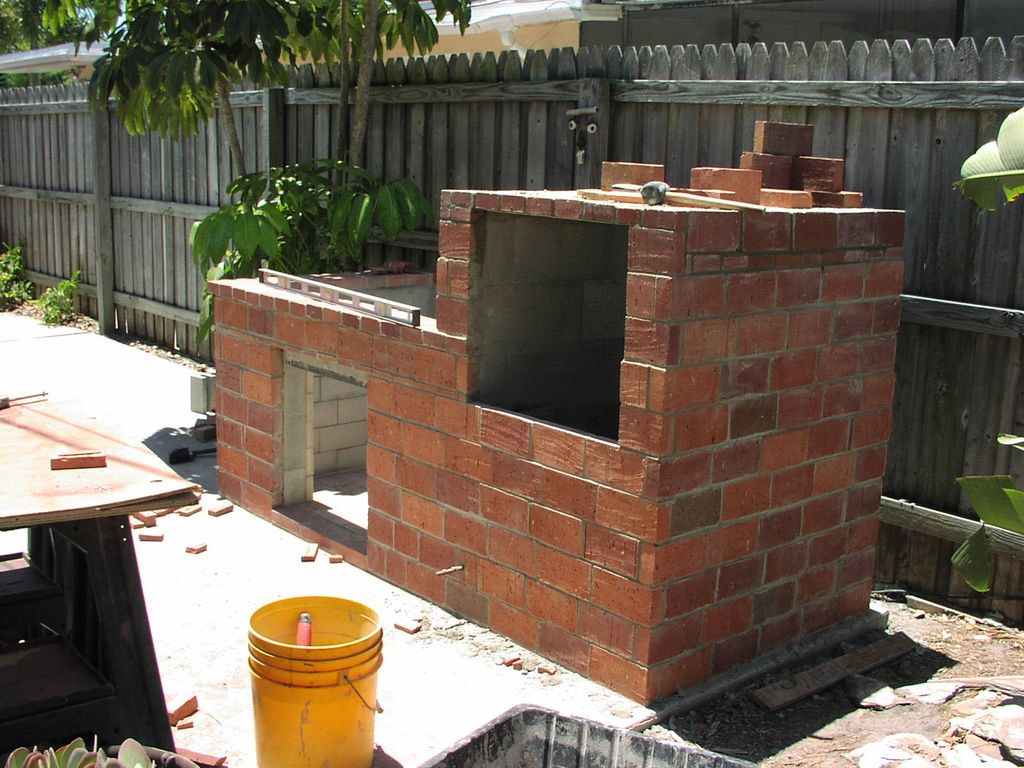
Step 12: More Bricks!
I continue to clad my building with red brick.
Step 13: Smokehouse Concrete Roof
I made a 5 cm concrete ceiling with a hole for the chimney. To reinforce it, I used a wire mesh and 13 mm reinforcement. The technology that I already tested when creating jumpers: I put together a wooden box 5 cm deep, fixed the wire mesh and fittings inside, making sure that they were located in the center of the box, then mixed 68 kg of concrete and poured the resulting solution into the mold. After leveling the surface of the solution, I covered the mold with a piece of plastic and left it to harden for 3 days.
Together with our son and his friend, we installed the ceiling in place, not forgetting to give it a slight slope for diverting rainwater.
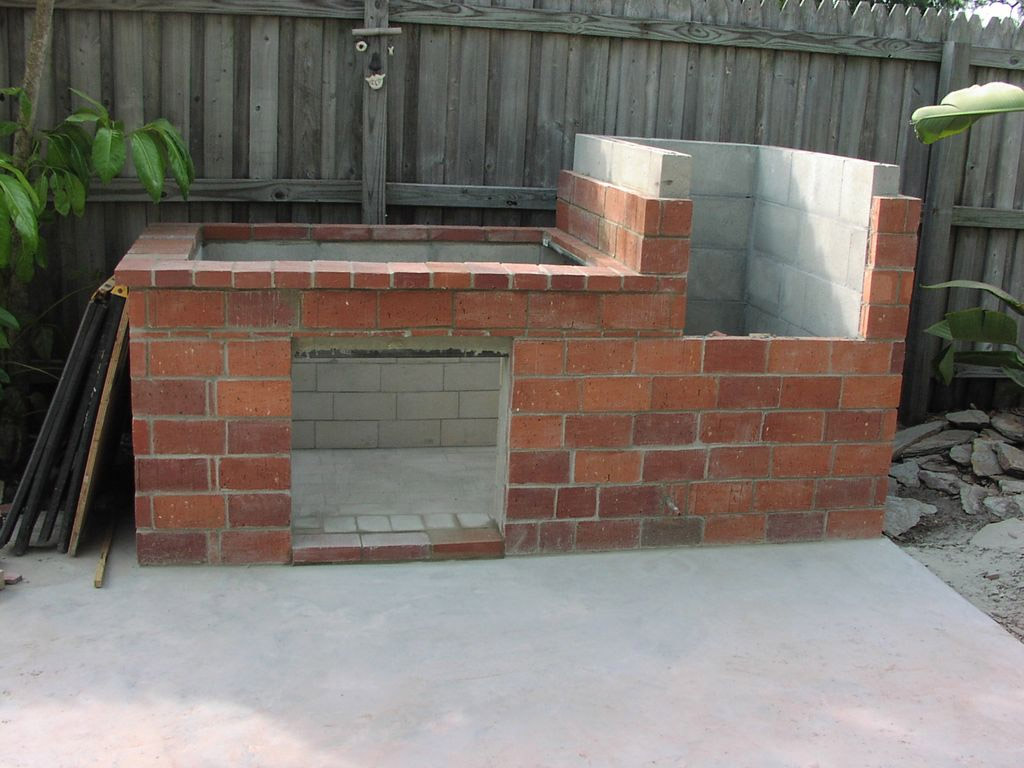
Step 14: Finish Finishing
I lay some more red brick. The finish is almost finished.
Step 15: How to do without steel? hm?
A visit to a hardware store and a workshop was not in vain. They had everything I wanted, and even more.
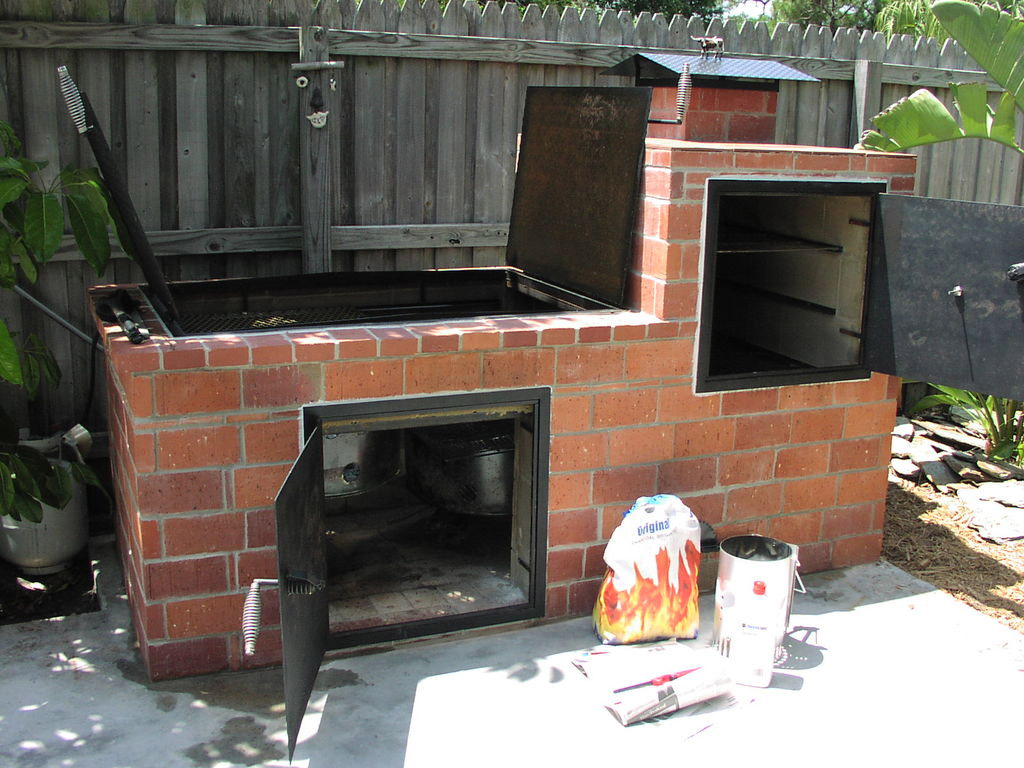
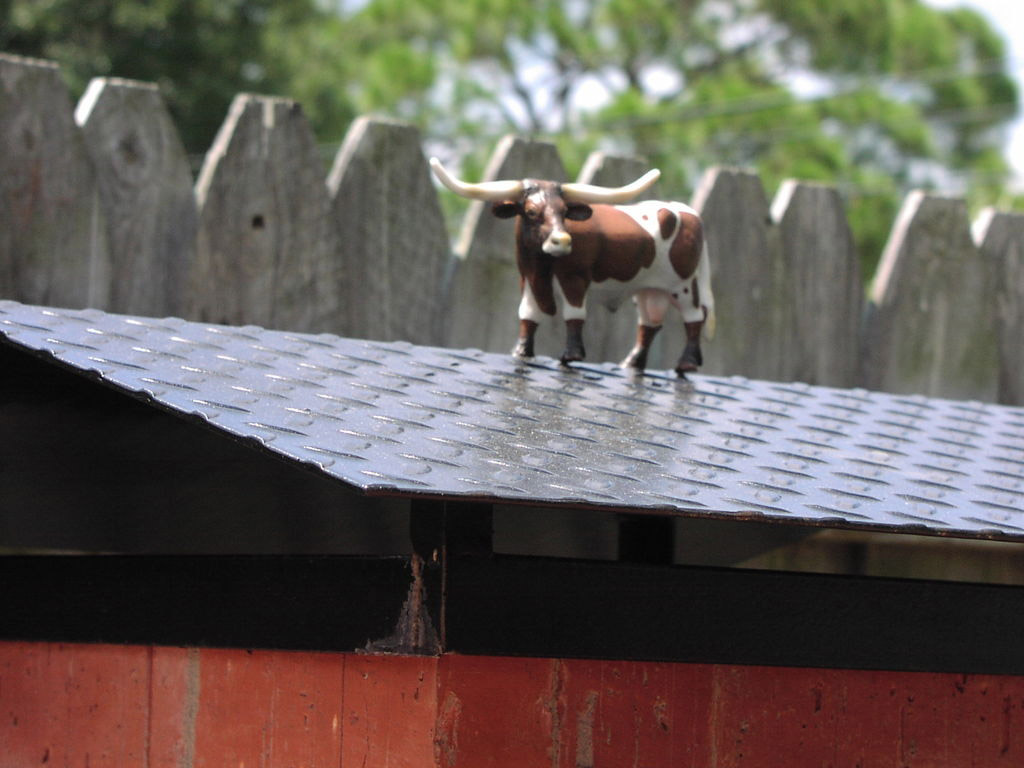
I cut out the doors for the grill and smokehouse of the required size myself. The upper grill covers and the chimney umbrella were made by my craftsmen from my workshop on my order.
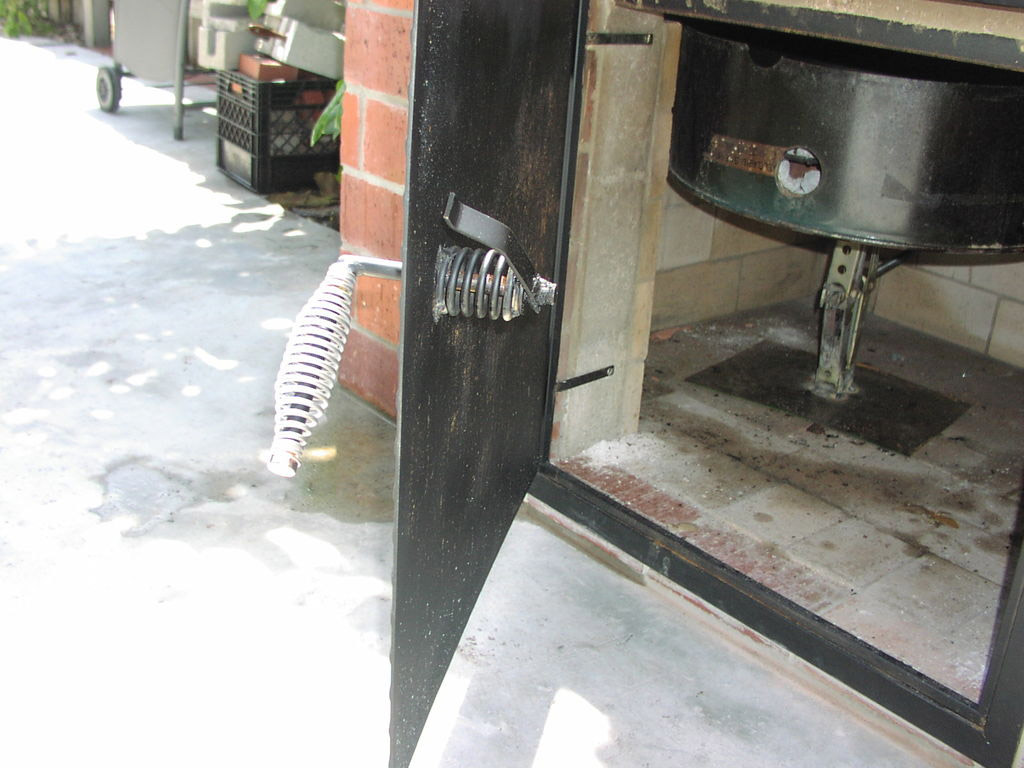
My friend, who lives in the neighborhood, had some excellent 20 cm tiles of the right color for me. Why not use them to finish the top of the smokehouse? You will get a wonderful surface on which you can put, for example, a plate. I bought door handles and welded hinges.
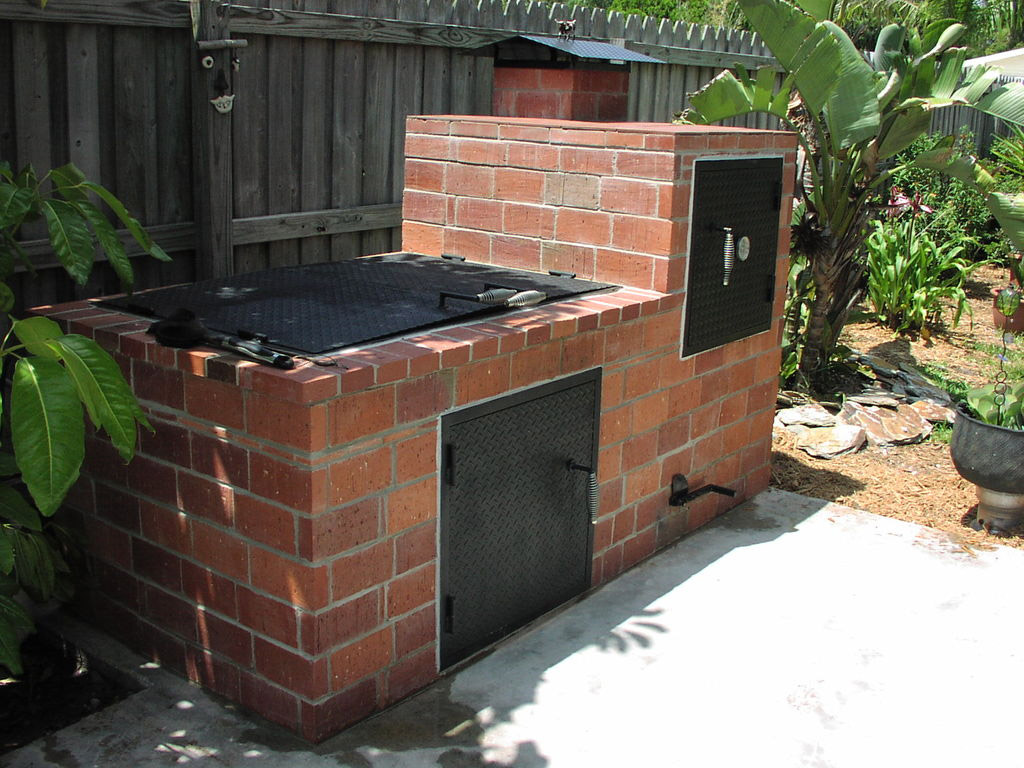
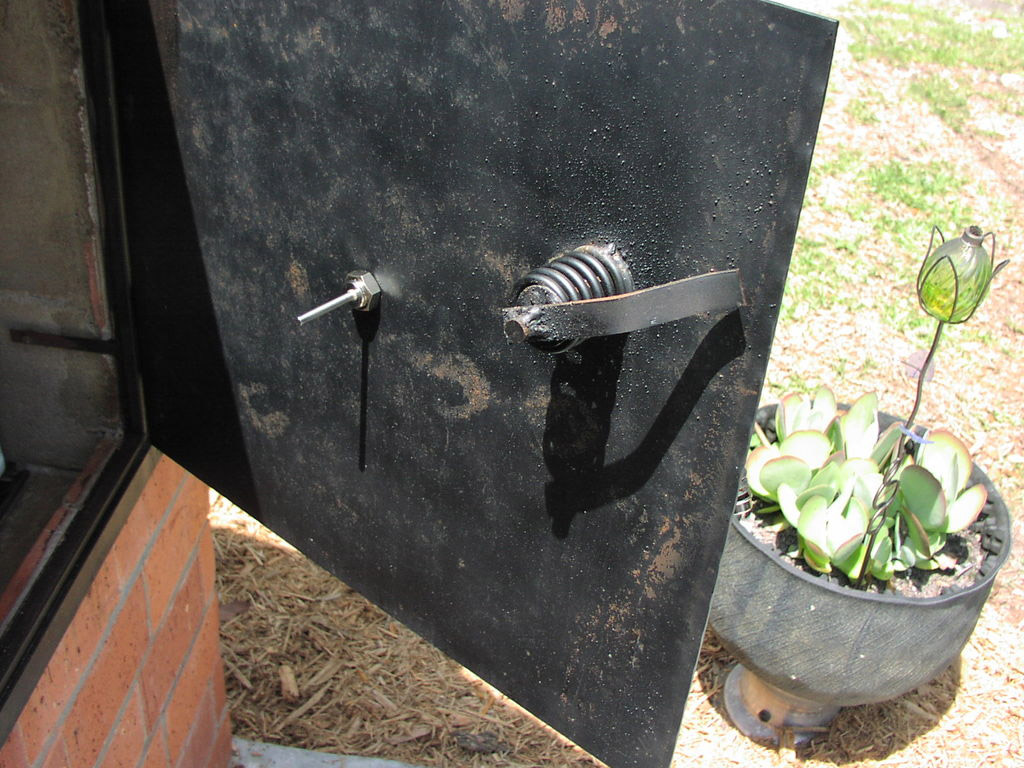
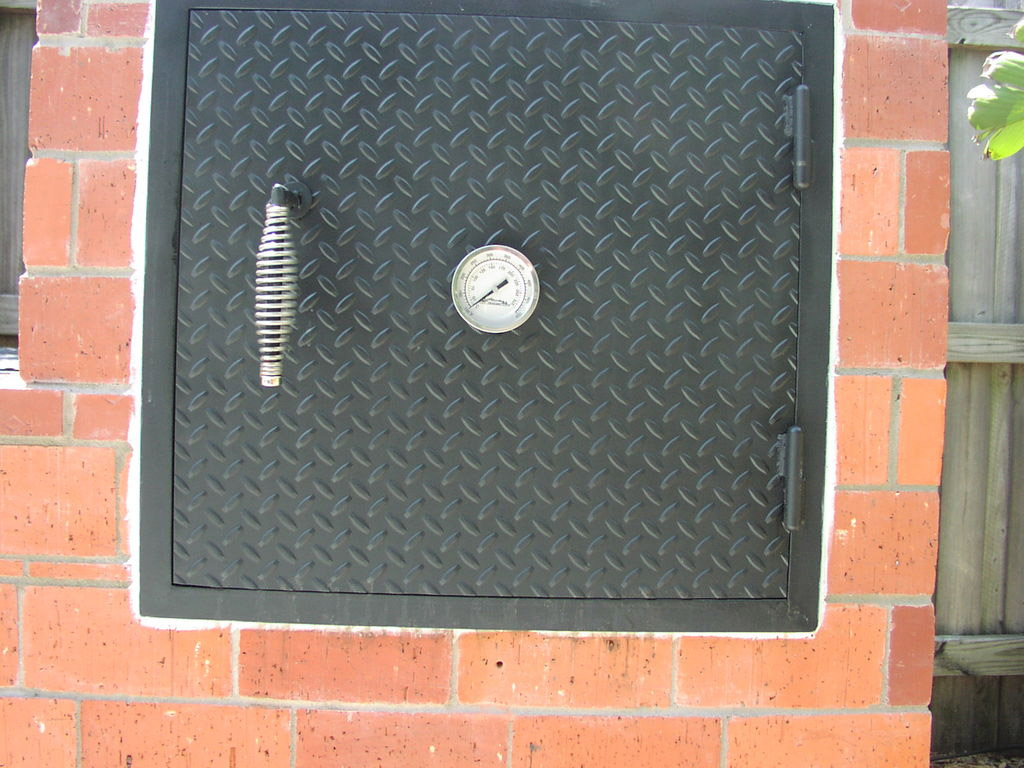
Stainless steel spring handles will not rust and heat. Bullet hinges hinges are strong enough and keep a clean look. Smoke damper to regulate air flow
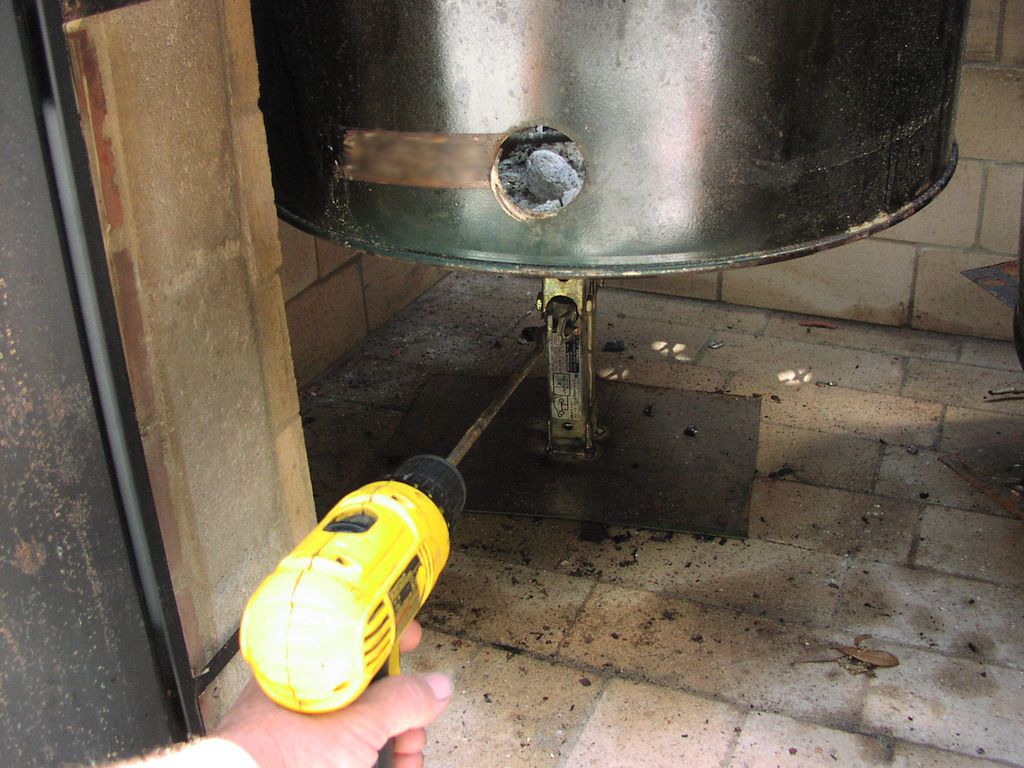
Step 16: Car Jacks and Steel Drum ... Why Not!
Two car parallelogram jacks and one steel tank with a capacity of 250 liters ... Everything will work for creating a barbecue. They are inexpensive, they are easy to find and do not need much modification.
For greater resistance to the upper and lower parts of the jacks, thin metal plates are welded. A metal container, sawn to the desired size, is installed on the jacks - this will be a roasting pan.
I can raise and lower my roasting pan as needed. Really helpful!
Step 17: Grill Grates
A square tube (1.9 cm), a metal grill and a 3 mm steel rod for small handles - that’s all I needed to make a grill.
I decided to make the grill two-level and move left and right. I will have the opportunity to choose at what level and over which fire to cook food. If you already build a barbecue, then, so that to cook there anything (up to hot dogs without lighting a fire).
I found on the Internet a fairly detailed description of how to construct a gas burner (www.hobartwelders.com/weldtalk/showthread.php?t=28224). I had to visit the workshop again ...
Step 18: Smokehouse
Welded several grates for the smokehouse and arranged them at different levels.
I took the spring for handles on the doors of the smokehouse and grill from the saddle of a self-propelled lawn mower (therefore, the lawn mower is now idle in the barn - it is able to mow grass, but it is not as convenient as before). I needed springs to make the handles work properly. Thanks to them, latches from curved metal plates keep the doors tightly closed, which is good news. I completed this stage of work by installing a beautiful large and easily readable temperature sensor.
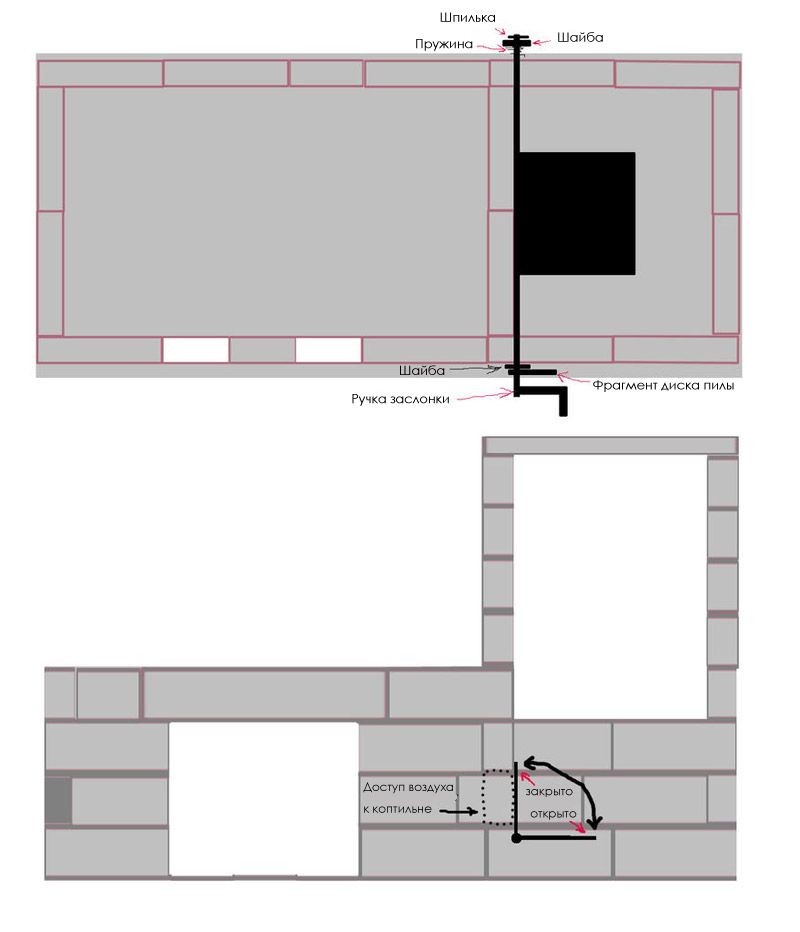
Step 19: Damper
The photographs and drawings shown here illustrate the damper assembly.
An exhaust valve (damper) is nothing more than a sheet of steel that changes its position when you turn the handle to which it is attached, and thereby regulates the heat flow.
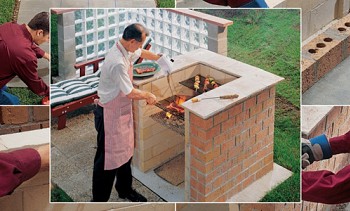
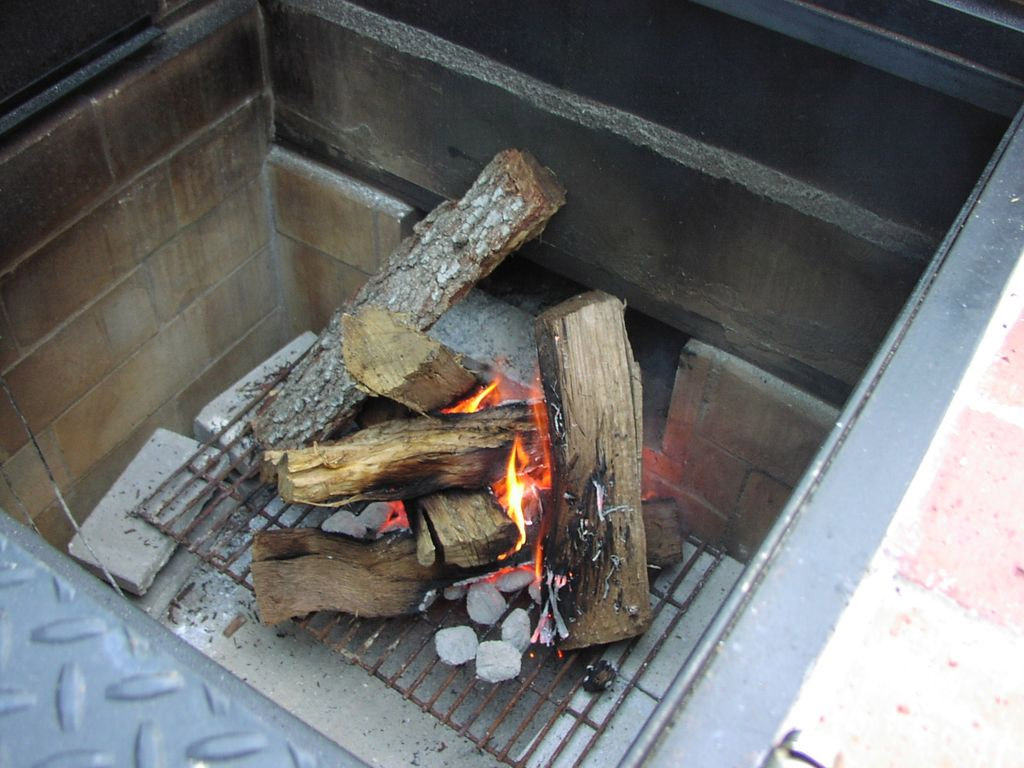
Step 20: Testing
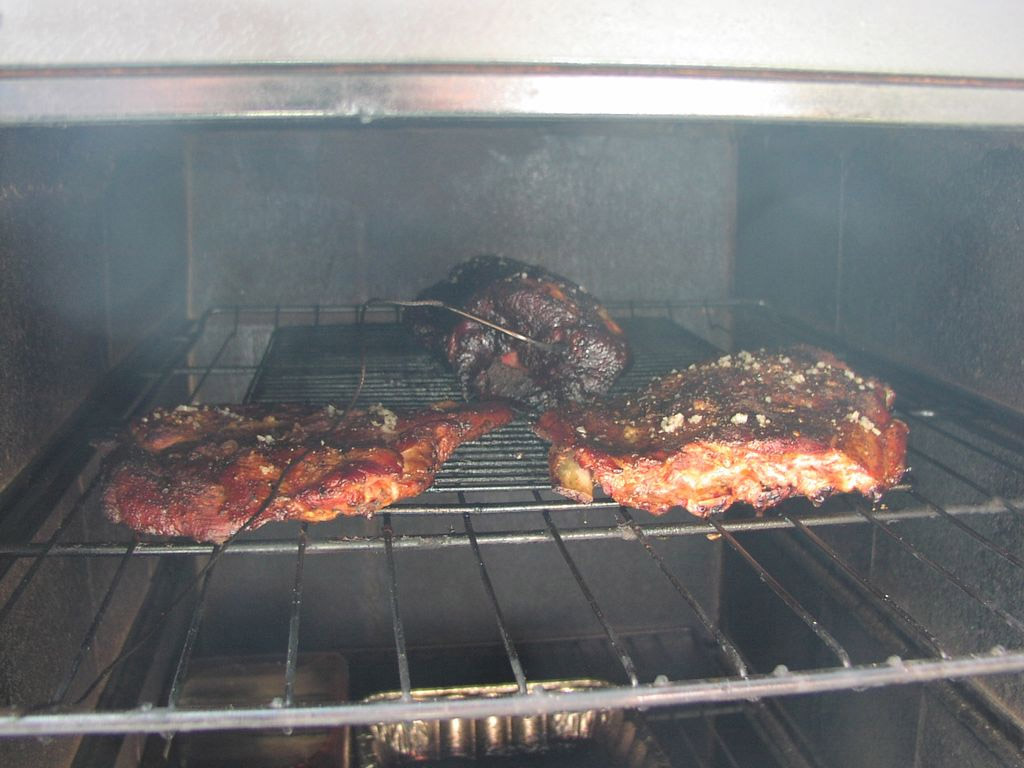
I did not start the fire too much. Only tested the smokehouse. Made sure it dries slowly. It keeps the temperature well, quickly warms up. During testing, it turned out that the gas burner requires a little modernization.
Step 21: BBQ Master
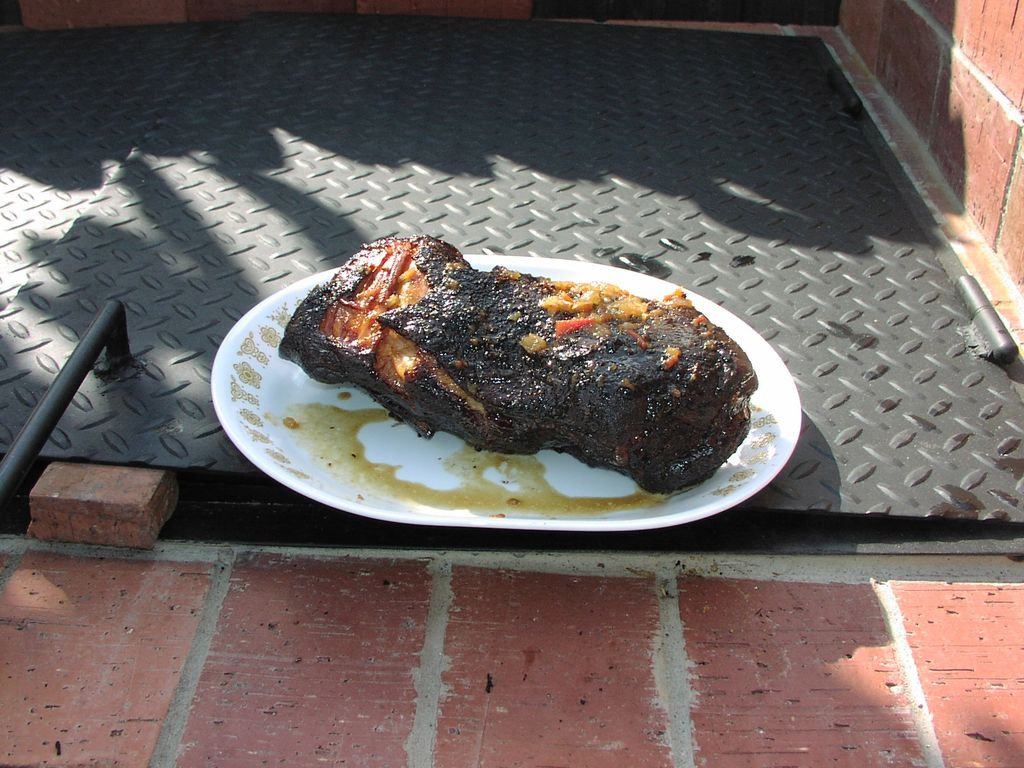
How great it was to cook outdoors in the summer!
I have smoked several beef briskets, pork shoulder blades and ribs and a myriad of chicken carcasses! All kinds of snacks - from peppers stuffed with bacon and shrimp to grilled vegetables, fruits, corn, potatoes! Everything turns out just great!
I have two good turkeys (the weight of one of them has already exceeded 7 kg), which I am going to smoke for the New Year. However, the holiday is still too soon, but I want to try it now!
Smoke rushes through the damper to the smokehouse. Air intake control allows you to control the temperature

Now you know how to make a barbecue with your own hands, which means you can get no less pleasure from work and its result.