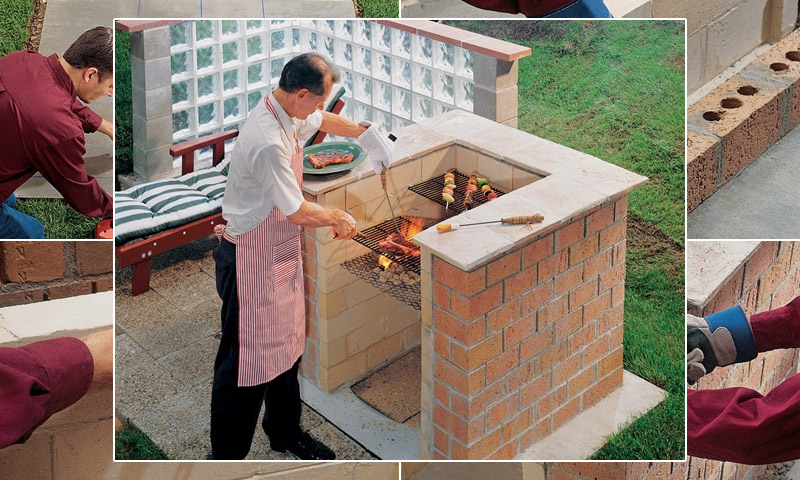
This article is a step-by-step instruction on how to lay brickwork barbecue from a brick with your own hands. The proposed barbecue option is a double-walled structure - the inner wall surrounding the cooking area is made of heat-resistant refractory bricks, the outer wall is made of modular bricks. (We chose a brick large enough to reduce the masonry work. You can use one brick, which is at hand, you just need to make some adjustments when implementing the project.)
A 10 cm thick air gap between the walls helps insulate the cooking area. On top of the walls are covered with a relatively thin tile of processed stone. In places of direct contact with fire, it is recommended to use refractory clay: it is heat-resistant and does not crack for a long time. The foundation of the barbecue is a 30 cm recessed support supporting a reinforced slab. A similar foundation, called "floating", is designed to take into account a possible shift with temperature. For local building code specifications, contact your construction supervisor.
Content:
- Preparatory work
- Markup
- Dry layout of the inner layer of bricks
- Dry layout of the outer layer of bricks
- Template for masonry work
- Laying the first row of bricks of the inner wall
- Laying the first row of bricks of the outer wall
- Masonry walls
- Metal elements (bundles)
- Solution smoothing
- Adding Grill Supports
- Stone Tile
Preparatory work
Prepare the site 120 × 150 cm. Dig a trench 30 cm wide and 25 cm deep along the perimeter of the site. Remove 10 cm of soil from the rectangle remaining in the middle of the trench and round its edges. Install the formwork around the site so that it protrudes 5 cm above the ground in the back and 3.5–4 cm above the front (a slight slope is necessary for efficient drainage of rainwater). Reinforce the support with five 130 cm pieces of reinforcement. Lay two pieces of reinforcement 10 cm from the front and back sides of the trench; place the remaining three evenly between them. Lubricate the formwork with drying oil or a special release agent and fill it with concrete.

Markup
After the foundation has hardened, which will take about a week, mark it with chalk, indicating the location of the inner edge of the brick wall. Draw a line 10 cm from the front edge of the foundation and perpendicular to it, in the center of the site, another. Symmetrically with respect to the center line draw a 60 × 80 cm rectangle, one side of which will be the first line.

Dry layout of the inner layer of bricks
Lay around the outside of the rectangle (without using mortar) the first layer of refractory brick, leaving gaps of 0.3 cm.
Note: The correct position of the inner walls is necessary so that they can support the grill. Start by placing whole bricks at the front line, lay the cut brick in the middle of the short wall.

Dry layout of the outer layer of bricks
Lay out the outer wall of a 10 × 8 × 20 cm modular brick. Leave a gap of ~ 1 cm between the bricks. The back wall should extend ~ 1 cm from the last refractory brick of the left wall. The cut brick should be in the middle of the left wall. Circle the perimeter of the outer wall with chalk.

Template for masonry work
Make a masonry pattern. On a wooden block, apply 8 marks corresponding to the size of the refractory brick, with a gap of 1 cm for the lower seam and 0.3 cm for the rest of the seams. The upper part of the final row should be at a distance of 90 cm from the bottom edge.Drag the top line to the other side of the template ruler. Lay out 11 rows of modular bricks so that the last row coincides with the mark of 90 cm (the thickness of each seam should be about 1 cm).

Laying the first row of bricks of the inner wall
Lay the mortar layer needed for 1 cm of seam along the chalk lines for the inner wall. Lay the first row of refractory bricks with a clearance of 0.3 cm.

Laying the first row of bricks of the outer wall
Lay the first row of bricks on the outside wall. Use oiled 1 cm inserts to create ventilation holes after the front bricks of the left and right walls.

Masonry walls
Begin the second row of masonry of the outer wall with a half brick adjacent to the inner wall. Bricks in the second row should be staggered relative to the first row. Alternately stack the rows of internal and external walls, after each row, check the quality of the masonry using the template and level. You can follow the diagram of bricklaying a brick with your own hands in the photographs accompanying our instructions.

Metal elements (bundles)
Place the metal bundles between the corners of the inner and outer walls on the second, third, fifth and seventh rows.

Solution smoothing
When the mortar has hardened enough to withstand minimal finger pressure (check the seams on both walls every few rows), smooth it. To do this, you will need a special tool for joint seams. The time when it is time to start the stitching depends on the type of solution used.

Adding Grill Supports
Above the fifth, sixth and seventh rows of masonry, attach T-shaped plates that will serve to support the grill grids. Use 10 cm plates with side protrusions no more than 2.5 mm thick. Place the plates along the side walls of the refractory brick at a distance of 8, 30, 45 and 67 cm from the back wall.

Stone Tile
When you have finished laying the walls, install a top floor made of treated natural stone. On the upper surface of the inner and outer walls, put a layer of mortar, designed for a joint thickness of 1 cm. Lay the ceiling from the tile, one edge of which should be flush with the inner surface of the refractory brick. Make sure the tiles are level. Process the seams when the mortar begins to set. After a week, seal the joints between the plates with a special composition and install the grill.

The work is done. Thanks to our step-by-step instructions for building a brick barbecue, you can do with your own hands what you will be proud of for many years. It remains to buy meat and vegetables and invite friends and relatives to visit ...